His first trick-or-treat experience. Mine too. So of course I ate some of his treats when he wasn’t watching. Think he’ll miss them? (He’s the one in the Jake costume, a mini pirate.)


His first trick-or-treat experience. Mine too. So of course I ate some of his treats when he wasn’t watching. Think he’ll miss them? (He’s the one in the Jake costume, a mini pirate.)

Two weeks ago, I picked grapes from the arbor out back with the kids, and made jelly. It was my first time ever making grape jelly. I was so excited to be using grapes from our own vines.


To make the jelly, I followed this recipe from pickyourown.org. Well, I mostly followed it. Actually I neglected a pretty important detail. The author suggests checking to see that the jelly is ready by putting a bit into a chilled spoon and watching how firmly it sets. I later read that grapes are especially variable in the amount of pectin they contain naturally, so you start with the smallest amount of packaged pectin that might be needed and then add more as necessary. Although it didn’t set as firmly as I’d have liked in the chilled spoon (hardly at all, in fact), I didn’t think I needed to add more pectin (even though she explicitly said YOU WILL PROBABLY NEED MORE THAN A SINGLE PACKET OF PECTIN), especially since I had run out. And one child was screaming and one was whining and I was ready to be DONE. And I was too sleep-deprived to make a well-reasoned decision. Not surprisingly, it didn’t set.


Luckily, pickyourown.org also has instructions on how to fix jelly that hasn’t set: dump the jelly out into a pot. Wash and re-sanitize the jars. Heat the jelly again. ADD MORE PECTIN, starting with a handy little table that gives amounts of lemon juice, sugar, pectin, and water for different amounts of unset jelly. Water bath again. And… we have green Concord grape jelly! It tastes almost like the grape jelly you buy in a store, but with a bit less intensity. I’m not sure why it’s different. Maybe the green ones are more mild? Maybe they could have used another week to ripen? In any case, I’m pretty happy with it. So delicious.


.

On Niko’s birthday, we visited Liepold Farms in Boring, about 45 minutes away from our home, and brought home several pumpkins: a big one and two littles for carving, plus a few decorative ones. This weekend was rainy and chilly, and we decided it was a perfect time for carving.

I picked up some carving kits at Fred Meyer. I like using them rather than a knife because they’re very small, just right for detail work, and have sturdy handles for Niko to hold. These ones came with a book of patterns. Most of them were a bit scary, not good for a little boy who has nightmares at the drop of a hat, but there was one called “Captain Cat” that I decided we could use. I found two others online at Nest of Posies. This year I didn’t feel like designing my own pattern – maybe some other year!
Niko was so excited to be allowed to cut. Last year he was only able to scoop out seeds, but this year I let him do the cutting for the simpler curves while I guided the direction of the blade. He was sooooo careful. Of course, he had a blast scooping out the slimy innards as well. He was amazed that there were “spider webs” inside the pumpkins.
The Fred Meyer carving kit came with instructions that were a bit different than I’ve seen before. Instead of engraving or perforating the pumpkin’s skin to transfer the design, they recommended wetting the paper, smoothing it onto the pumpkin, and then covering it with cling wrap. I was intrigued and decided it couldn’t hurt to try. In addition, I wiped down the pumpkins with bleach water to reduce mold growth. See my steps below:


It worked fairly well. Aaron, who carved the Captain Cat pumpkin, said the cling wrap got in the way when he tried to cut small details, so he pulled it off and just left the wet paper on. The other designs were much simpler. I did find just a few spots where the cling wrap stretched rather than cutting smoothly – I just inserted the knife further along the design and cut toward the original cut. I think if I’d been the one doing the large cat design, the paper would have dried up and started peeling before I had finished. Aaron is efficient and fast. He had his done before I’d done the other two, and he started later. To be fair, I was doing mine with Niko’s “help,” and had to stop to feed Sofia and put her down for a nap. Anyway. If you can work fast, taking the cling wrap off is probably fine – otherwise, I recommend leaving it on. I found it was much neater and faster than the engraving or perforating method.
Here are the final products! Not bad for a four-year-old, a distracted mom of a nursing baby coming down with a cold (both of us), and a dad in the middle of cooking a meal.


I’ve recently begun to realize how important food is to me. Every bite of a familiar food is loaded with nostalgia, accompanied by a dazzling parade of memories. Every recipe comes with a cascading waterfall of linked stories connected to the people in my life. Food brings with it a sense of family, closeness, love, friendship. Even now, far from the commune where I grew up, I dislike eating alone; growing up on the farm, meals and snacks were generally group activities. Someone was always hungry. The rustle of a bag or the soft whooosh of the refrigerator door could draw a crowd even if you started out alone in the roomy kitchen.
[This seems like a good place to mention that if you really just want a recipe, not a long reminiscence, you can scroll way down to the end for instructions.]
So, for me, chai (my preferred method of infusing caffeine into my veins) is a drink fraught with memories. When I took my first life-changing sip, I was nineteen. I was in the dreamy yet awkward stages of undeclared (and, according to the strict rules of the communal college I attended, forbidden) love. Just outside Haines, Alaska, the farm we lived on was a college destination predominately for youngsters like me who’d grown up in a network of communes across the world – mostly in North America, mainly in the North. I had left Ontario the previous year to attend the Christian college for a degree in education.
Now, here we were, a gaggle of sheltered kids freed from the early-morning weekly duty of helping in the commune’s bakery in Haines, basking in the freedom of an unsupervised stroll to a coffeeshop. Mountain Market was dubious territory. It was frequented by the “granola” crowd, modern-day hippies wearing natural fibers, sporting natural body odor, and topped with naturally unwashed hair. We, on the other hand, typically wore modest business-casual attire. Girls in skirts ranging from prim to trendy, but all below the knee, tops carefully buttoned to three fingers below collarbones; boys with shirts neatly tucked; all scrupulously clean. Not a beard, tie-dyed garment, or matted lock of hair in sight.
I’d never had an espresso drink, didn’t care for coffee, had certainly never seen a headful of dreadlocks like the one on our friendly (yet terrifying) barista. “I don’t know what to order,” I whispered to my crush Aaron, who was at the college for just one year “for the experience.”
“You need to get a chai. You’ll love it.”
“A what?” At least espresso was identifiable as coffee. I had no idea what a chai was. It sounded as unfamiliar and scary as the tentacle-headed blond barista behind the counter.
“It’s a spiced tea with steamed milk. It’s really good.”
I wanted to impress Aaron with my willingness to try new things, with my bravery, so I tremulously ordered a chai. I don’t know if he was impressed with my daring, but my first sip drove out all thoughts of wowing the love of my life. It was the best thing I’d ever tasted. I was hooked.
And now the taste of chai is inextricably intertwined with the painfully agonizing delight of new love.
Fastforward a decade. On a frosty winter weekend morning, baby snugly tucked into his car seat carrier, I was meeting my best friend for coffee and gossip at a cafe in Anchorage, Alaska, exactly seven minutes from my home and two minutes from hers. I usually ordered a chai – why change a perfectly pleasing tradition? But I perused the menu anyway, because I’m a compulsive reader and menus contain words. And there it was. CHAI CITRUS SPRITZER. Made with spiced tea, citrus flavors, and ginger. I ordered. I sipped. I was transported. From then on, I was completely hooked. It was cool, it was spicy, it was fizzy, it was a perfect meld of complementary flavors.
At some point I stopped exclaiming over the amazing taste experience I was having and restrained myself from forcing Gracia to try the new drink, and we went on to our comfortable routine of comparing work stories, discussing politics and philosophy, noting tiny Niko’s milestones, and laughing uproariously together. But secretly, in the back of my mind, I was deconstructing the drink with each sip. A little orange…a little lime…a bit of ginger…I was sure I could recreate this.
And of course I did. And now I’m sharing it with you. Here, for your sipping pleasure, is the flavor of deep and lasting friendship; of Alaskan winter turning so very slowly to spring; of the burdens of new motherhood lightened by the irreverent hilarity of a childfree friend; all laced with that original chai flavor of new love on an Alaskan commune. I give you: Chai Citrus Spritzer.
1. Collect your ingredients: prepared chai, crystallized ginger, orange juice, lime juice, sparkling water, a tall glass. I drink chai routinely; I used to get my Oregon Chai at Costco in packs of three. You can get it at Fred Meyer, a Kroger store, too. Or you can brew your own from tea bags, as I do these days. (You can see my recipe here.) The crystallized ginger is usually available in the bulk section of a grocery store. It adds flavor, but if you can’t find it, don’t let that stop you from enjoying this drink. It’s not crucial. For the carbonated water, I like to use the store brand cans of lemon-lime flavored sparkling water from Fred Meyer. The mild citrus flavor helps merge all the flavors of the drink, and it just happens to be really really inexpensive. If it’s not available, just use any plain seltzer water.
2. Grate, crush, or use a knife to trim small pieces of crystallized ginger into the glass. How you prepare it depends on how big the chunks of ginger are. When I started making it, the crystallized ginger I found in the bulk section at Fred Meyer came in very small pebble-like pieces, and I just crushed them between my fingers as I dropped them into the glass. Now that I’ve moved and get it at a different store, it comes in big 1/2 inch cubes, and I have to cut pieces.
3. Add about two fingers of orange juice and a dash of lime juice.
4. Fill the glass just over half full with the prepared chai.
5. Top with carbonated water.
6. Close your eyes and slowly sip the cool, sparkling, ginger-and-citrus concoction. Breathe deeply. Relax. Ahhhh….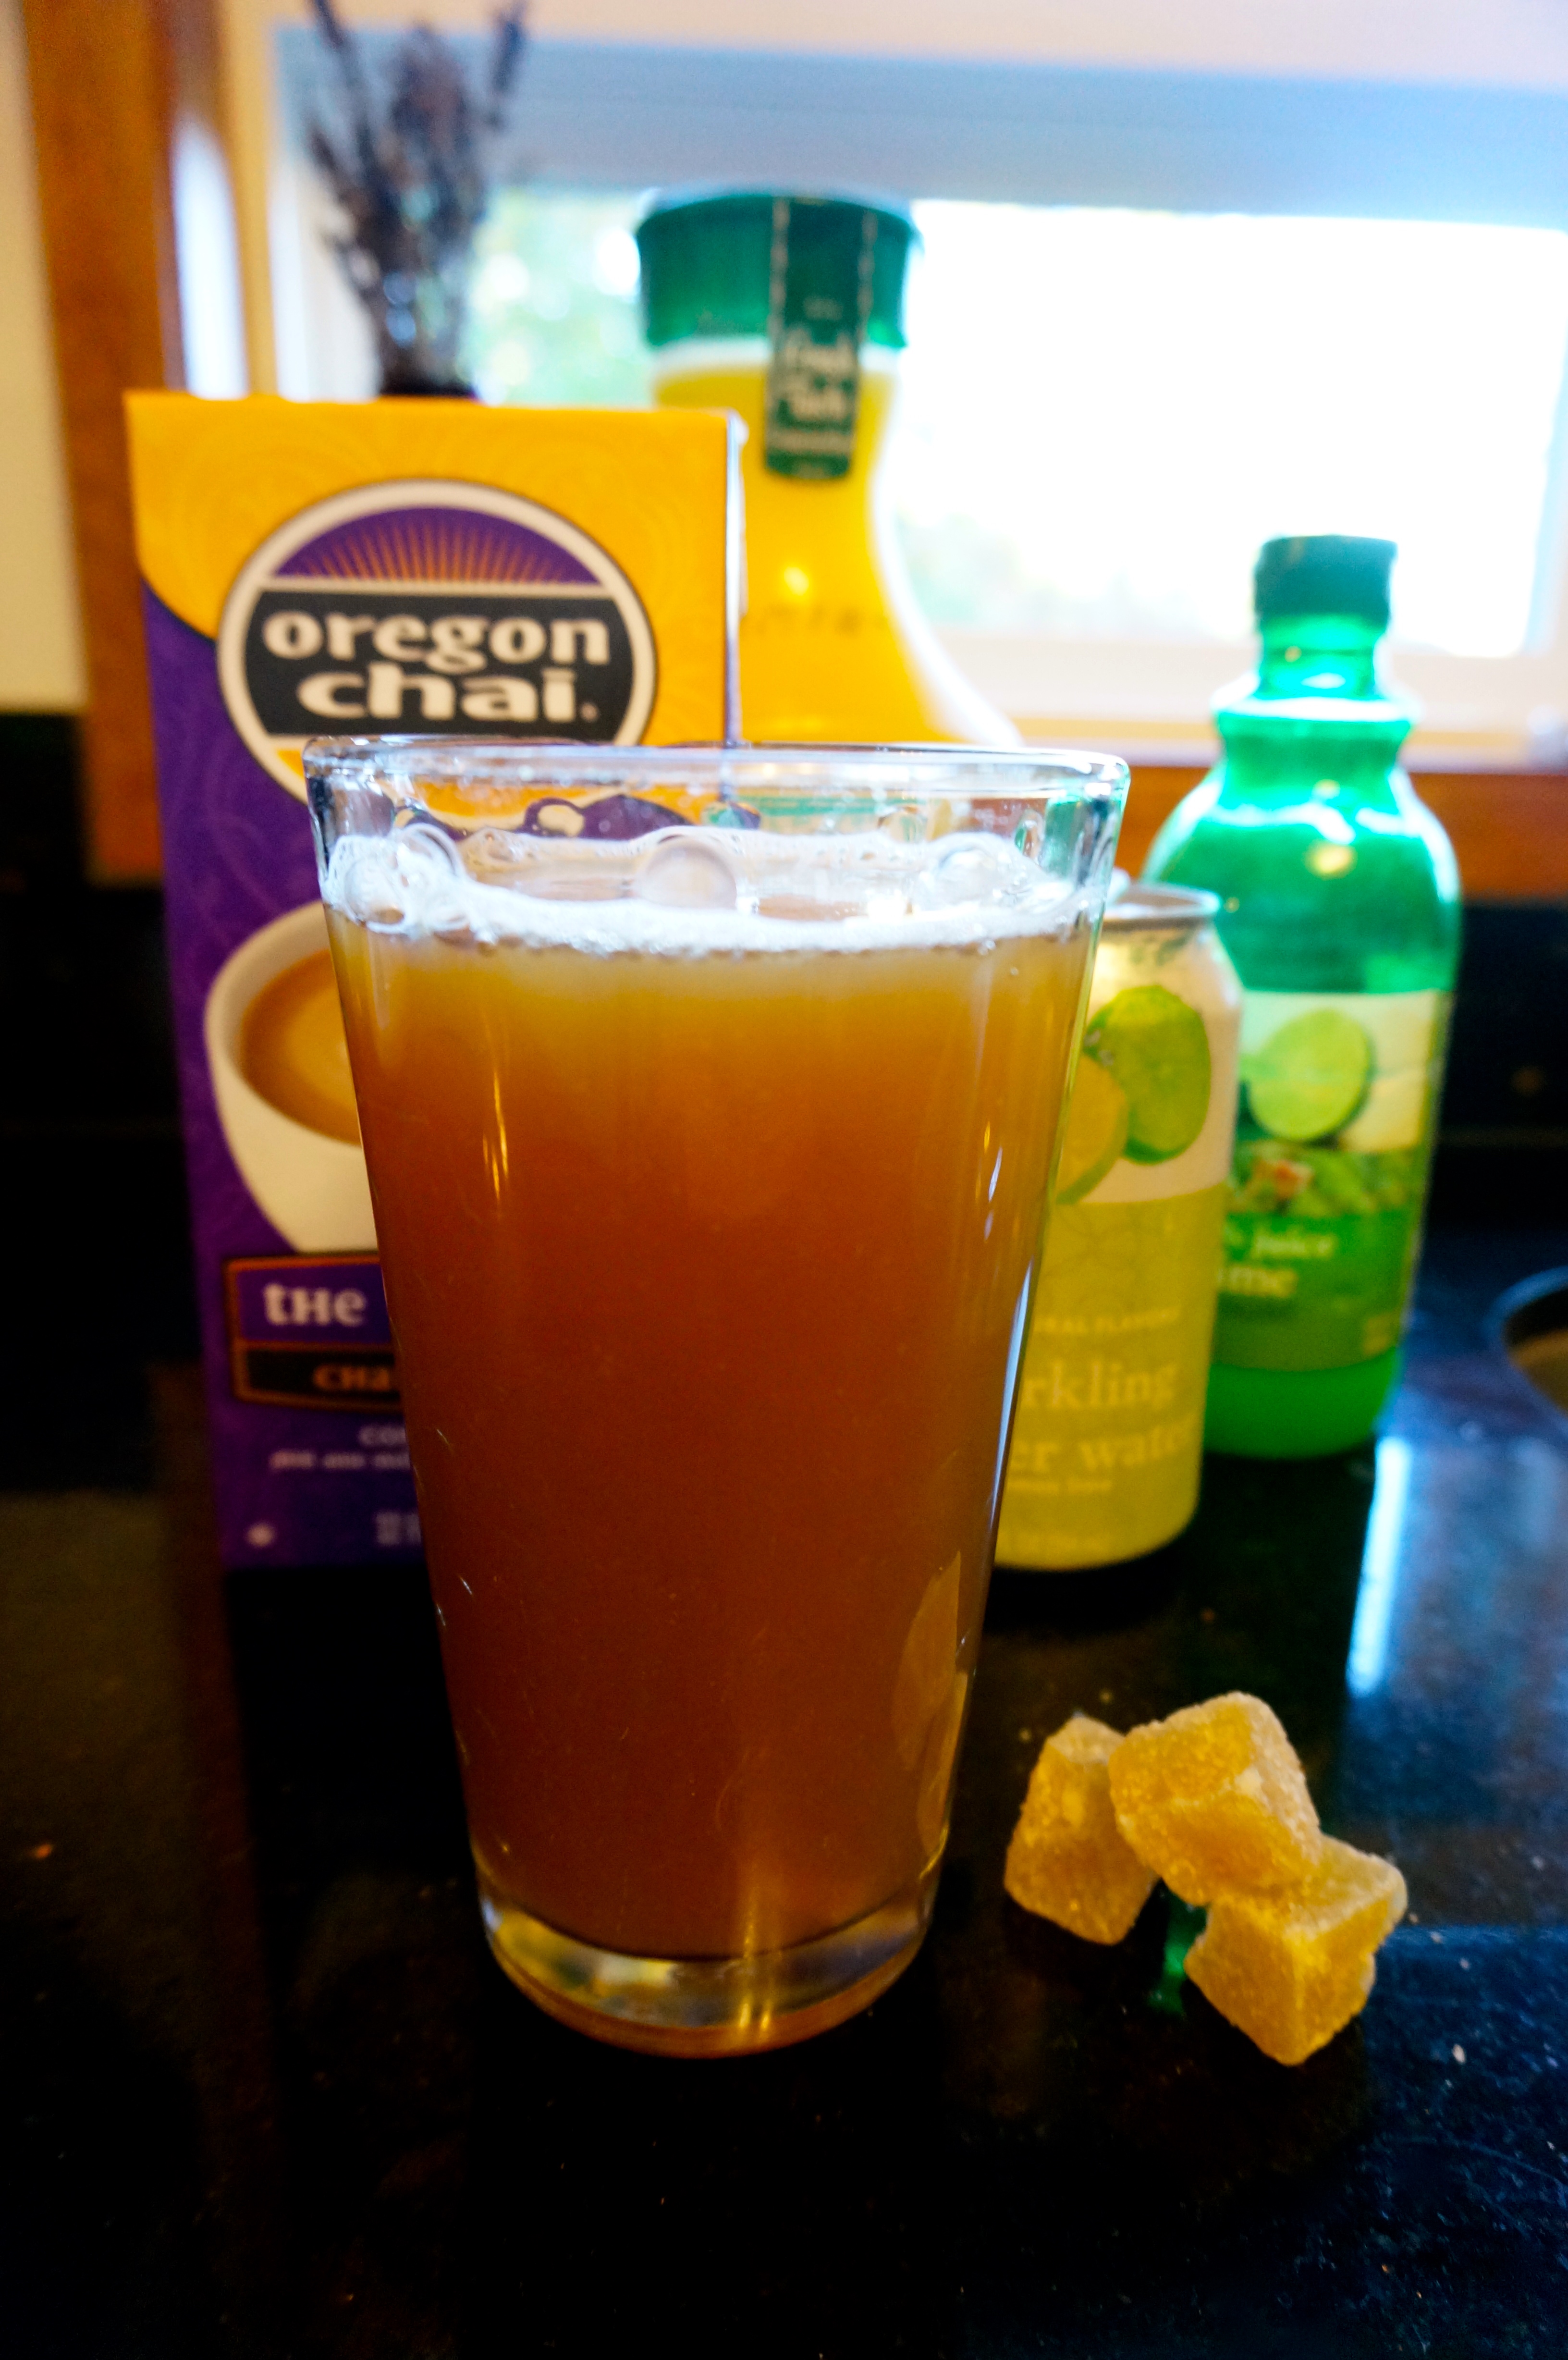

I’m a northern girl by heritage but not, it turns out, by disposition. I was raised in the frigid winter climate of Northwestern Ontario and the deep snow of northern British Columbia, then migrated to the somewhat milder Anchorage, Alaska. Every year since I was old enough to take notice, I’ve hated the long, dark winters of the north more and more. After the excitement of the winter’s first flakes and drifts, snow is just one more way for my feet to get wet and cold. Watching the sun set at 3:30 in the afternoon as I wave goodbye to my students. shivering, is not my idea of enjoying the majesty of Alaska’s nature. Searching for a dry, snow-free spot to sit at the end-of-school picnic in May brings me no joy. No, beautiful as Alaska is, it’s not the place for me.

About seven years ago, my husband and I formulated a “five-year plan.” We would keep our new Anchorage condo until we had built up enough equity to make money selling it. That would be our ticket out of Alaska. We would move to a place where you didn’t have to use a flashlight to navigate to your car at four o’clock on a winter afternoon, where the highway wasn’t littered with traffic accidents every time fall turns to winter. Every. Single. Time. Lifelong Alaskans forget how to drive in snow, each and every winter. We dreamed of finding a place where people grew crops like melons and tomatoes right outside in their yards, no greenhouses and heaters needed. A place where summer was summer, and fall was a riot of color. A place where there was no snow to shovel. In other words: paradise.
A year and a half ago, we packed up our belongings and son, and, with the help of my best friend who helped me stay sane on the long drive to Juneau, Alaska so that we could take the ferry to the state of Washington, we left the place that had been home for Aaron for thirty-one years (only fourteen for me).
Now we’ve been in our “forever home,” a low brown house on two acres, built in 1979, for one summer, after renting for a year while house hunting. And it is paradise. Here it is, the end of October, and the slight chill of the last few rainy days feels like a rainy day at the height of Alaskan summer. Friends and family in my former homes of Ontario and Alaska are already shoveling driveways and bundling up for the walk from front door to car. Today I was out shopping in a cardigan over a thin summer shirt, and was perfectly comfortable.
But the comfort of a moderate climate is small compared to the sense of amazement I find as I garden here. A couple of weeks ago I saw shoots coming up near our pond, where last spring grape hyacinths had bloomed. I went to the omniscient Google and discovered that these amazing little bulbs sprout in the fall. Plants that come up in October? I had no idea plants did that!
That same weekend, I did some fall planting of bulbs that will provide bright springtime color next year. Planting in the fall! Now, I know people in Anchorage must
  have done this too, because I have seen with my own eyes crocuses pushing up through snow in late April and early May. But I have never myself done fall gardening. It’s a mind-boggling and delightful concept for someone to whom October means the first snowfall of the year.
Things just grow on their own here, with no help from human hands. In the soil half of my compost bin (that is, the half that is done decomposing and is now rich garden dirt, as opposed to the half that is freshly discarded leaves and kitchen scraps), I just discovered five young tomato plants and a large patch of parsley, joining a melon plant that has an almost-ripe melon that we’ll pick soon. In fact, this isn’t good, not from a gardening perspective. It’s a sign that the compost pile isn’t decomposing properly, killing seeds with internal heat as it ought to. But I can’t bring myself to uproot these miracle plants. Young parsley and tomatoes sprouting in October, as if no one told them they’re supposed to be curling up and dying under a layer of snow, rigid inside a foot of frozen earth. Incredible.

But, oddly, the plant that has solidified this sense of magical fall growth has been garlic. Researching this summer, I discovered that garlic is best planted either in fall, for a late-winter/early spring crop, or in late winter for an early summer crop. So said, again, the all-knowing Google. But I didn’t truly believe it. What northern gardener would put plants into the ground in October and expect to harvest in winter? I planted anyway, obedient to the wisdom of search engines, shaking my head at the crazy idea of a January harvest.

And then. And then. Last weekend I strolled past the garden bed where I’d planted the garlic. And – NO WAY! Seven fresh green sprouts against the dark brown earth. Sprouts in October, promising a winter crop, a frail green proof of paradise.

Oregon. My own paradise, found.


Recently, we had the supremely talented Garrett Beatty of Nuro Photography come to our home for a fall photo shoot – our very first professional family photos. (This is not a testimonial, but I’m just saying, this guy is AMAZING.) I thought this would be a great opportunity to paint 10-month-old Sofia’s toenails a bright color, envisioning a closeup shot of sweet, chubby baby toes. I had painted her nails once before, a pale, sheer, almost invisible pink, so I already knew this would be no easy task. Naturally, I turned to the Internet for help, realizing a bright coral would be much more problem-prone than sheer pink. And I have to tell you, the Internet really let me down. Tutorials for baby nail polish application? Barely there. I did find one article in eHow. It included this quote:
“Softly hold baby’s foot in your non-painting hand…Take brush that you prepared and gracefully dab each of the five toe nails. Bend your head down and gently blow on the toes to dry them a bit.”
Gracefully? Those that know me know that there are very few things I do gracefully. Walk down a hallway? Nope. Eat a sandwich? No way. Dance? Definitely not. Is it likely I’m going to GRACEFULLY dab near-permanent color onto the toenails of my squirming little darling? Not at all. Not going to happen.
Since I wasn’t finding much help at eHow, I decided to create my own, more realistic guide, complete with three different approaches. Maybe it will help someone out there.
Approach 1
1. Collect all your materials ahead of time:
*Baby (preferably yours)
*Nail polish – if Baby is a toe-nibbler, take the extra time to find a non- toxic version like Piggy Paint (Sofia isn’t, so I just used my own nail polish)
*Nail drying spray
*Towel or sheet that you don’t mind destroying
*Q-tips
2. Place Baby on towel or sheet.
3. Capture Baby before she reaches for the lamp’s power cord. Replace Baby on towel or sheet.
4. Reposition wiggly Baby on her back, legs toward you, with a fascinating toy in her hands. Wrap your legs gently around her legs so her hands can’t reach her toes.
5. Open bottle of nail polish. Wipe most of the polish off, since those toenails are TINY.
6. Grip Baby’s foot, angling toes toward you. Use your thumb and finger to immobilize the toe you’re aiming for, while your other fingers and your palm wrap around the foot.
7. One toe at a time, carefully but quickly dab polish onto the nail. That toy won’t hold Baby’s attention for long.
8. Sadly observe that the polish smeared from nail to skin, as Baby’s nails are actually smaller than the brush. Remind yourself that she’s having a bath tonight and it should be easy to wipe the nail polish off her damp skin. Use a Q-tip to get off what you can. [I don’t recommend using nail polish remover on a baby’s skin if you can help it…smearing nail polish on is probably bad enough without compounding the problem.]
9. Quickly apply the nail drying spray.
10.Repeat steps 5-7 with the second foot.
11. Realize, aghast, that Baby has somehow managed to smudge polish off three nails from the first foot and onto…oh no!…the carpet, despite all your precautions.
Approach 2
1. Collect materials:
*Baby with partially painted, somewhat smudged toenails
*Nail polish (see above)
*Nail drying spray
*Q-tips
*Cuddly blankie
*Rocking chair
*Feeding mechanism (bottle, breast, etc.)
*Crib
2. Put Baby to sleep using blankie, chair, and feeding.
3. Open nail polish, wiping almost all of the polish off the brush and leaving only a tiny corner of the brush wet.
4. Grip Baby’s foot, angling toes toward you. Use your thumb and finger to immobilize the toe you’re aiming for, while your other fingers and your palm wrap around the foot. [This is still necessary. Babies don’t stop moving just because they’re asleep.]
5. Quickly and carefully dab nail polish onto the smudged nails.
6. Apply the nail drying spray.
7. Hold your breath as sleeping Baby twitches and jerks foot away from the spray.
8. Repeat steps 3-7 with second foot.
9. Place baby in crib. Observe smudges that have already, as if by malevolent magic, appeared on tiny toes.
10. Repeat steps 3-7 with both feet. Tiptoe away, satisfied that you’ve achieved near-perfection.
11. Return when Baby wakes. Examine toes and wail when you discover that three toes on right foot and two toes on left foot have had polish smudged completely off. Consider writing angry letter to nail drying spray manufacturers.
Approach 3
1. Collect materials:
*Hungry, wide-awake baby with several smudged toenails
*High chair
*Finger food
*Nail polish
*Nail drying spray
*Q-tips
2. Place Baby securely in chair. Apply finger food to chair’s tray.
3. Open nail polish, wiping almost all of the polish off the brush and leaving only a tiny corner of the brush wet.
4. Awkwardly hunch forward so as to be level with Baby’s feet. Grab a foot, angling toes toward you. Use your thumb and finger to immobilize the toe you’re aiming for, while your other fingers and your palm wrap around the foot.
5. Quickly and carefully dab nail polish onto the smudged nails.
6. Apply the nail drying spray.
7. Release foot. Yelp with dismay as Baby stretches, pressing toes onto underside of high chair’s tray.
8. Despite burgeoning conviction of doom, repeat steps 3-6 with second foot.
9. Once again, realize that toes have already become smudged. As color still remains, decide that you don’t really want that close-up shot of baby nails after all, and that this is good enough. Glumly eat your own lunch while Baby gleefully kicks freed toes against high chair tray.
And that’s all I’ve got. I think I understand why no one else has ventured to write a paint-Baby’s-nails tutorial…and why eHow’s article isn’t illustrated. It’s because this is an impossible task. I take it all back – ignore the steps above. Refrain from painting your infant’s toenails. Your longsuffering Baby will thank you.

Niko has turned four. It was a bit of a letdown for him, I think. It seems he was expecting to be noticeably bigger, and to FEEL different. Instead, here he is, still himself. Maybe he’ll feel better after his little family celebration today, with balloons and hats and dinosaur decorations on cupcakes he helped make.
For me, his birthday is a source of anxiety. I don’t know how to celebrate birthdays. I certainly don’t feel up to organizing a multi-family celebration like the one we recently attended, which was lovely but would have left me a distressed mess of nerves if I’d been in charge of it.
I remember my own fourth birthday. I was allowed to wear my favorite dress: green gingham, topped with a white pinafore with an apple embroidered on the front. I walked with my parents and brother through the frosty winter early-morning darkness from our small house to the commune’s main gathering area (known as the Tabernacle – this was a religious commune) for breakfast. I was so full of excitement that I hopped up and down as I announced “I’m four!”
To my astonishment and distress, this was greeted with a unanimous refusal to believe my news. “No way!” “You are not!” “You’re still three! You’ll be three FOREVER.” I was on the brink of tears as I wondered if my mom had been misinformed. However, these were kind people who knew me very well and loved me as much as my own family did, and they quickly saw my worry and surrounded me with hugs and congratulations. I remember the smiling faces, being swung high in the air by a pair of strong friendly arms, the feeling of warmth fizzing inside at the rare display of excess attention.
And that was it. No birthday song – for years, I thought that was a fiction, something that authors invented for the benefit of their book characters. No hats, no balloons, no special meal. I had my first birthday cake two years ago, when I announced to Aaron that, despite being in my thirties, when many people are happy to stop counting the years, I wanted a birthday cake. He came through with a lovely pink grapefruit confection, topped with shimmering pink frosting and candles. I ate far too much of it and was satisfied that I had now had a birthday experience.
So I really don’t know what birthdays should be like. And I worry that I’m not coming through for Niko. For me, it wasn’t a big deal. None of my friends had birthday celebrations, either – or Christmas, Halloween, or any other “worldly” or “pagan” celebration. I didn’t feel left out or deprived. But Niko’s friends have moms who fling themselves into birthdays with joyous abandon. His friends have large gatherings with party favors, games, and excited kids shepherded by cheerful parents. I worry that, at some point, Niko will notice that his mom – with the social anxiety that comes from a constant sense of feeling like a cultural transplant, plus, thanks to ADHD, the difficulty focusing enough to plan an actual party – isn’t up to par.
I don’t mean this to be a depressing post. Niko is a happy little boy. We will conclude a fun, Niko-focused day (ToysRUs! Lunch at McDonald’s!) with a small family celebration. We’ll wear hats. He’ll have balloons. We made fondant dinosaurs for cupcakes. He will get to tear into a few gifts, some of which he chose himself. And we have a tentatively planned play date with his best friend, for later this week, at which he will have yet another dino cupcake. More importantly, he has a family who loves him.
Yes, my sweet boy will be fine. But still, the anxiety persists. Maybe it always will. All I can do is keep on trying. Trying to act like a normal person who wasn’t raised on a commune. Trying to pretend these new cultural activities make sense to me. And, most of all, trying to be a good mom to my kids. After all, isn’t that what we all want? And I’m pretty sure, from talking with other parents, that we all feel inadequate. Anxiety-ridden. Filled with self-doubt. We all second-guess ourselves.
Maybe I’m not so different, after all. Commune girl or no, when those feelings are distilled and examined microscopically, that’s what I’m left with. I just want the best for him. Just like you.

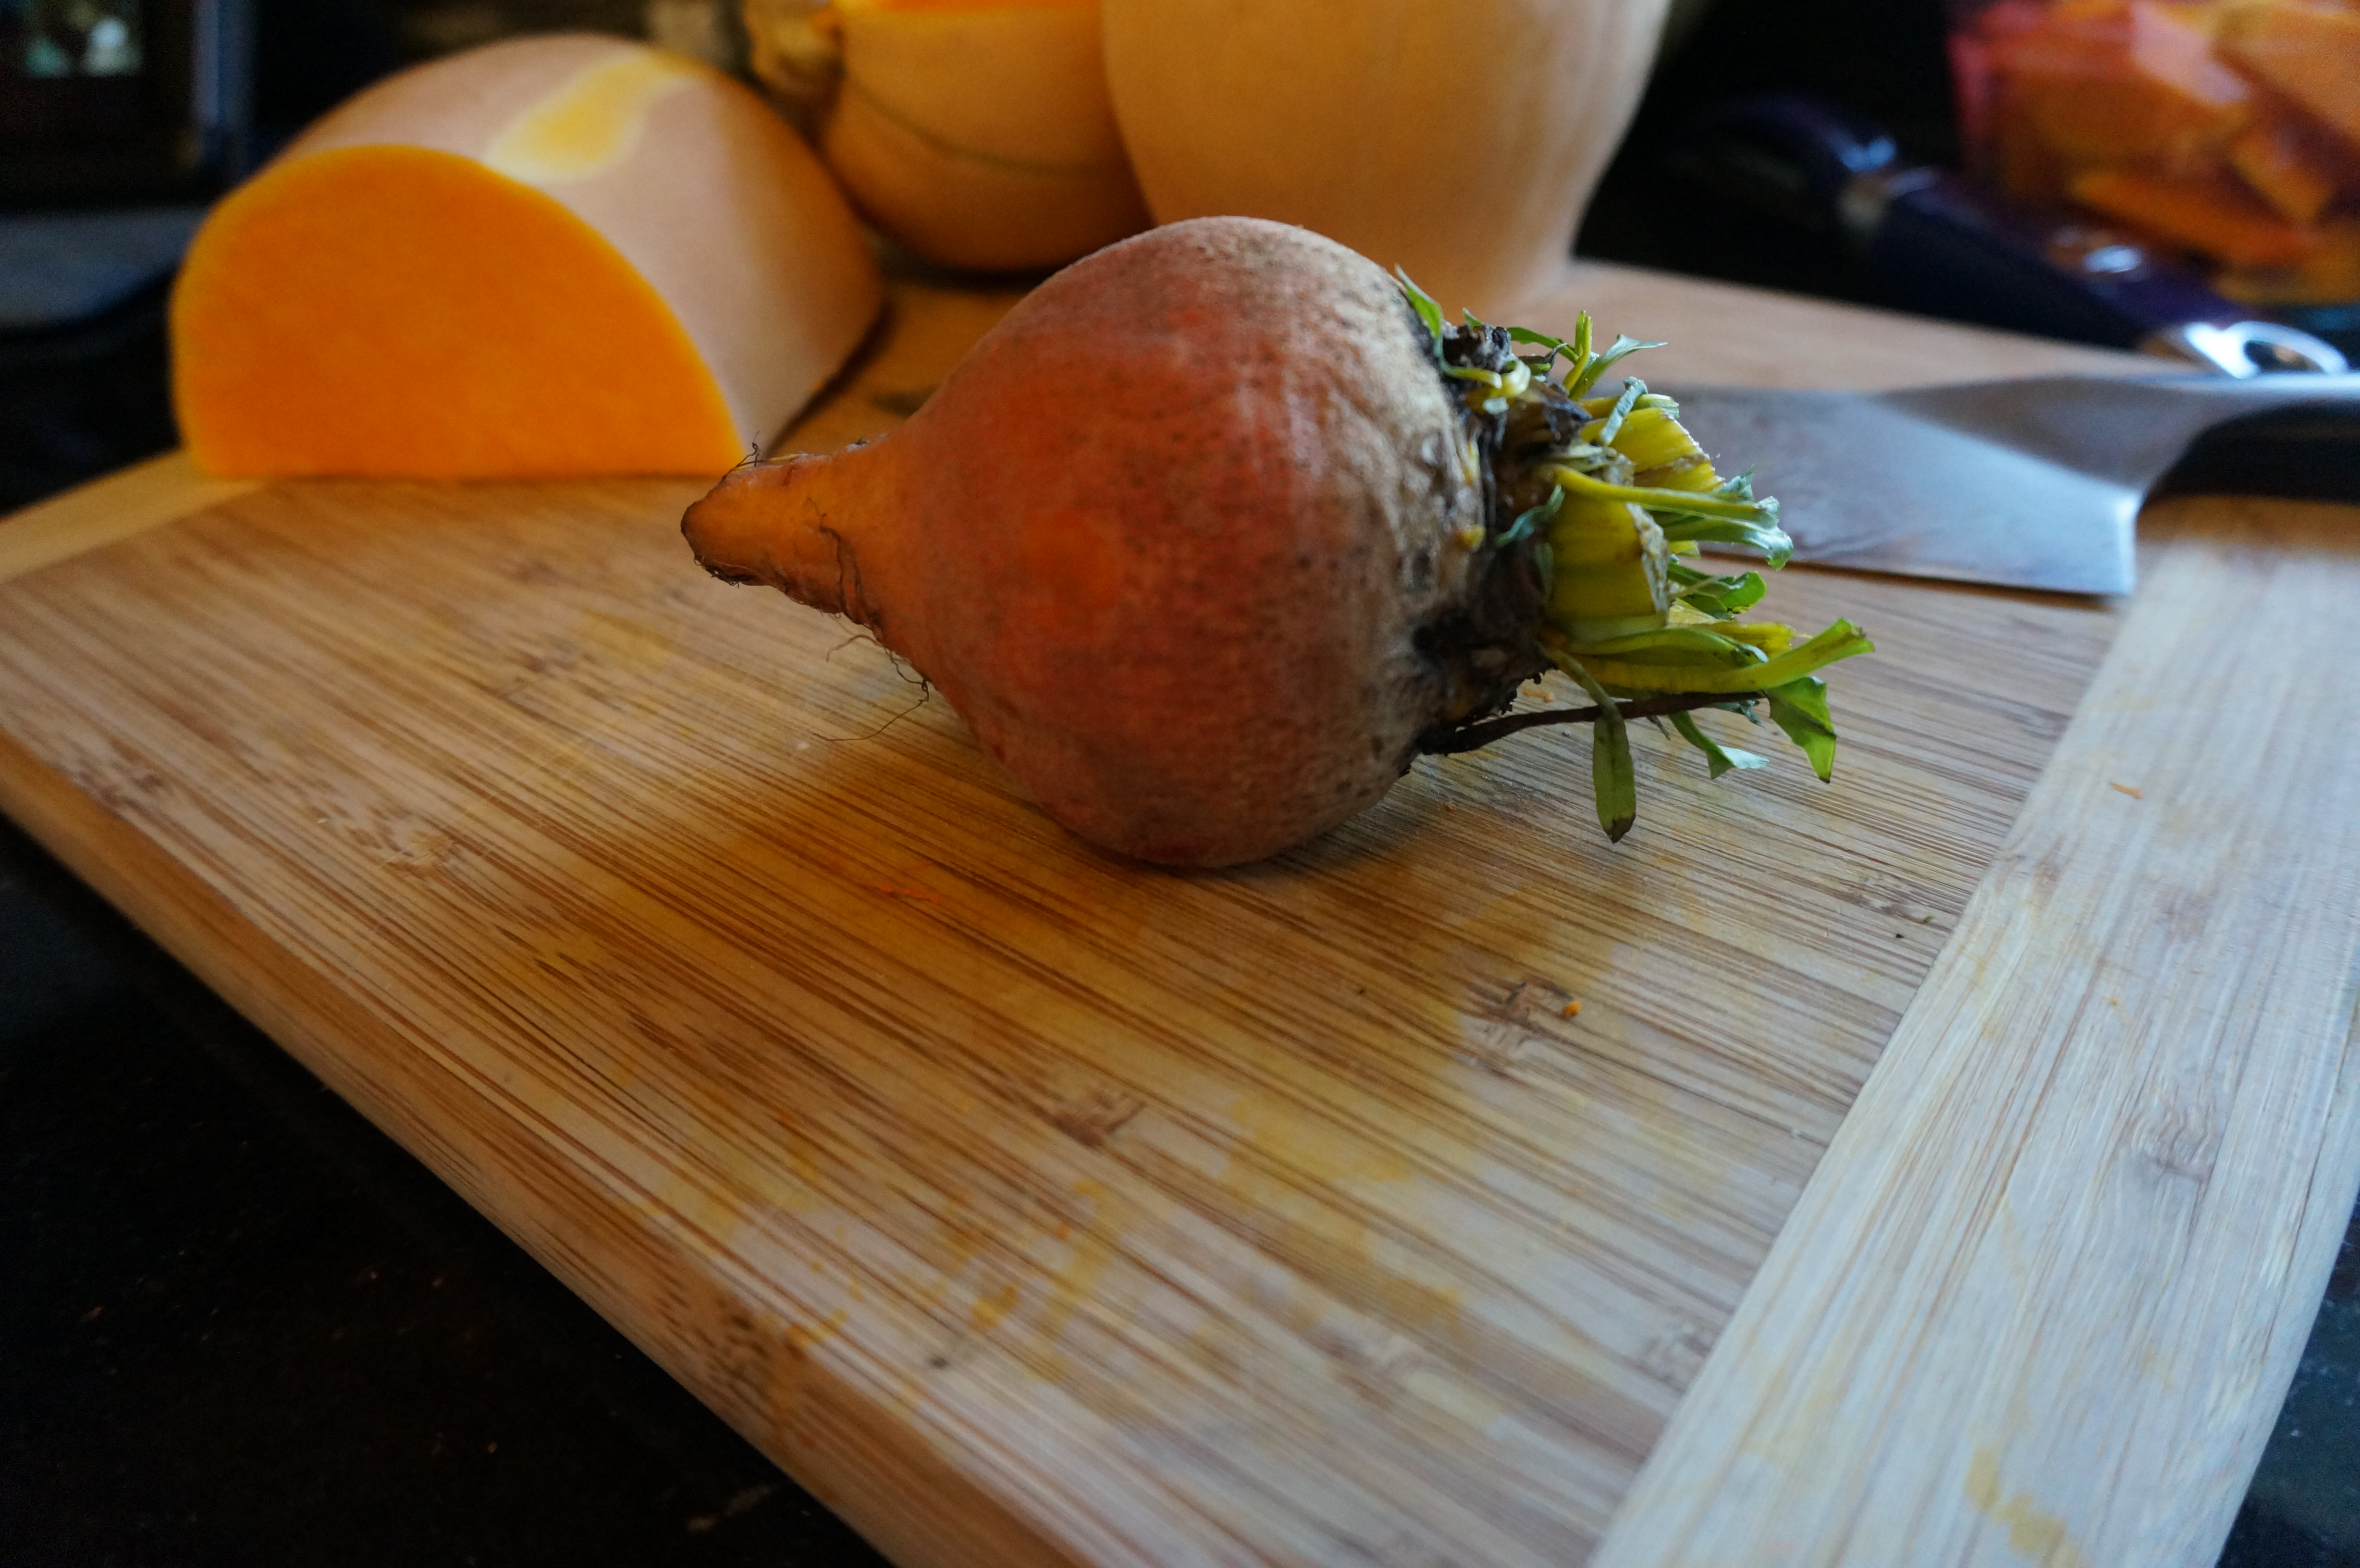
The honest-to-goodness chilly, rainy fall days we’ve had lately are perfect for a nice hot bowl of soup. I came up with this tasty squash soup last week, when I just couldn’t find a recipe online or in my cookbooks that I liked and was desperate to find a delicious, quick, easy way to turn my gigantic butternut squash into soup. And then I opened my fridge and saw two lonely, lovely little golden beets (so very different in flavor and character than their show-off red cousins) huddling together in the crisper, and was inspired. I love squash soup, but it can be a little bland – the golden beets give it a warm autumn flavor, perfect for a rainy day.
Optional: Add a dollop of thyme-flavored yogurt to finish off each bowl. If, like me, you’re avoiding dairy, you can get cultured coconut milk to use instead of cow’s milk yogurt – I find mine in the “Non-Dairy” section of my local grocery store. Just stir some thyme and a little honey into it and let it sit at room temperature while you make the soup, then put a generous spoonful into each bowl of soup before eating.
You’ll need a butternut squash (I used about ¼ of a really large one), an onion, a potato, and two golden beets, with 3 cups of chicken broth for liquid. Don’t even think about using red beets. The ghost of my childhood self – forced to endure cold, slippery, sour pickled beets all winter long, their garish juices assaulting the mashed potatoes and meatloaf innocently resting on my plate – will rise up and haunt you if you do. And I don’t even want to think about the color your soup will be if you try a red beet. If you don’t have a golden beet, just use a couple of carrots for the added bulk and a bit of sweetness. For seasoning, you’ll need about 2-3 sprigs of thyme and ¼ teaspoon of cumin powder, which is a great balance for the coconut oil you’ll use to brown the onions.
Slice an onion. You’re going to be pureeing this, so you don’t have to worry about perfection here, but thinner is better for easy blending later on. Melt 2 tablespoons of coconut oil in a large pot on medium heat. Be aware that it burns fairly easily and melts very quickly – don’t give it too much time to heat before adding your sliced onion. Cook the onions till they’re soft and just starting to brown. While the onion is browning, quarter your butternut squash and peel the quarter you plan to use right now. Leave the peel on the rest so you can store it without losing its freshness. Cut it into ½ inch cubes until you’ve chopped 1½ cups. Peel your potato and the beets as well, and cube them like the squash. Then, add your chicken broth to the pot – I use Costco’s Better Than Bouillon with water – and turn the heat up to high. Dump in the veggies, add the thyme and cumin, and let it simmer until everything is soft.

Now it’s time to puree. If you’re new to blended soups, a few words of advice: Don’t blend the whole thing at once, and have a towel ready to clamp down the lid of the blender. The hot liquid has a tendency to cause pressure buildup, and when the blades start whirling, you’re likely to have a mess at best and a faceful of near-boiling liquid at worst. Do half at a time. Drape your folded towel over the lid and hold it down firmly as you turn it on. The hot-liquid effect can be minimized by starting it at a low speed before going up to the highest speed, but trust me: you’ll still need that towel. (You should have seen my kitchen after my first attempt at broccoli-cheddar soup. Not pretty.) An immersion blender works well, too.
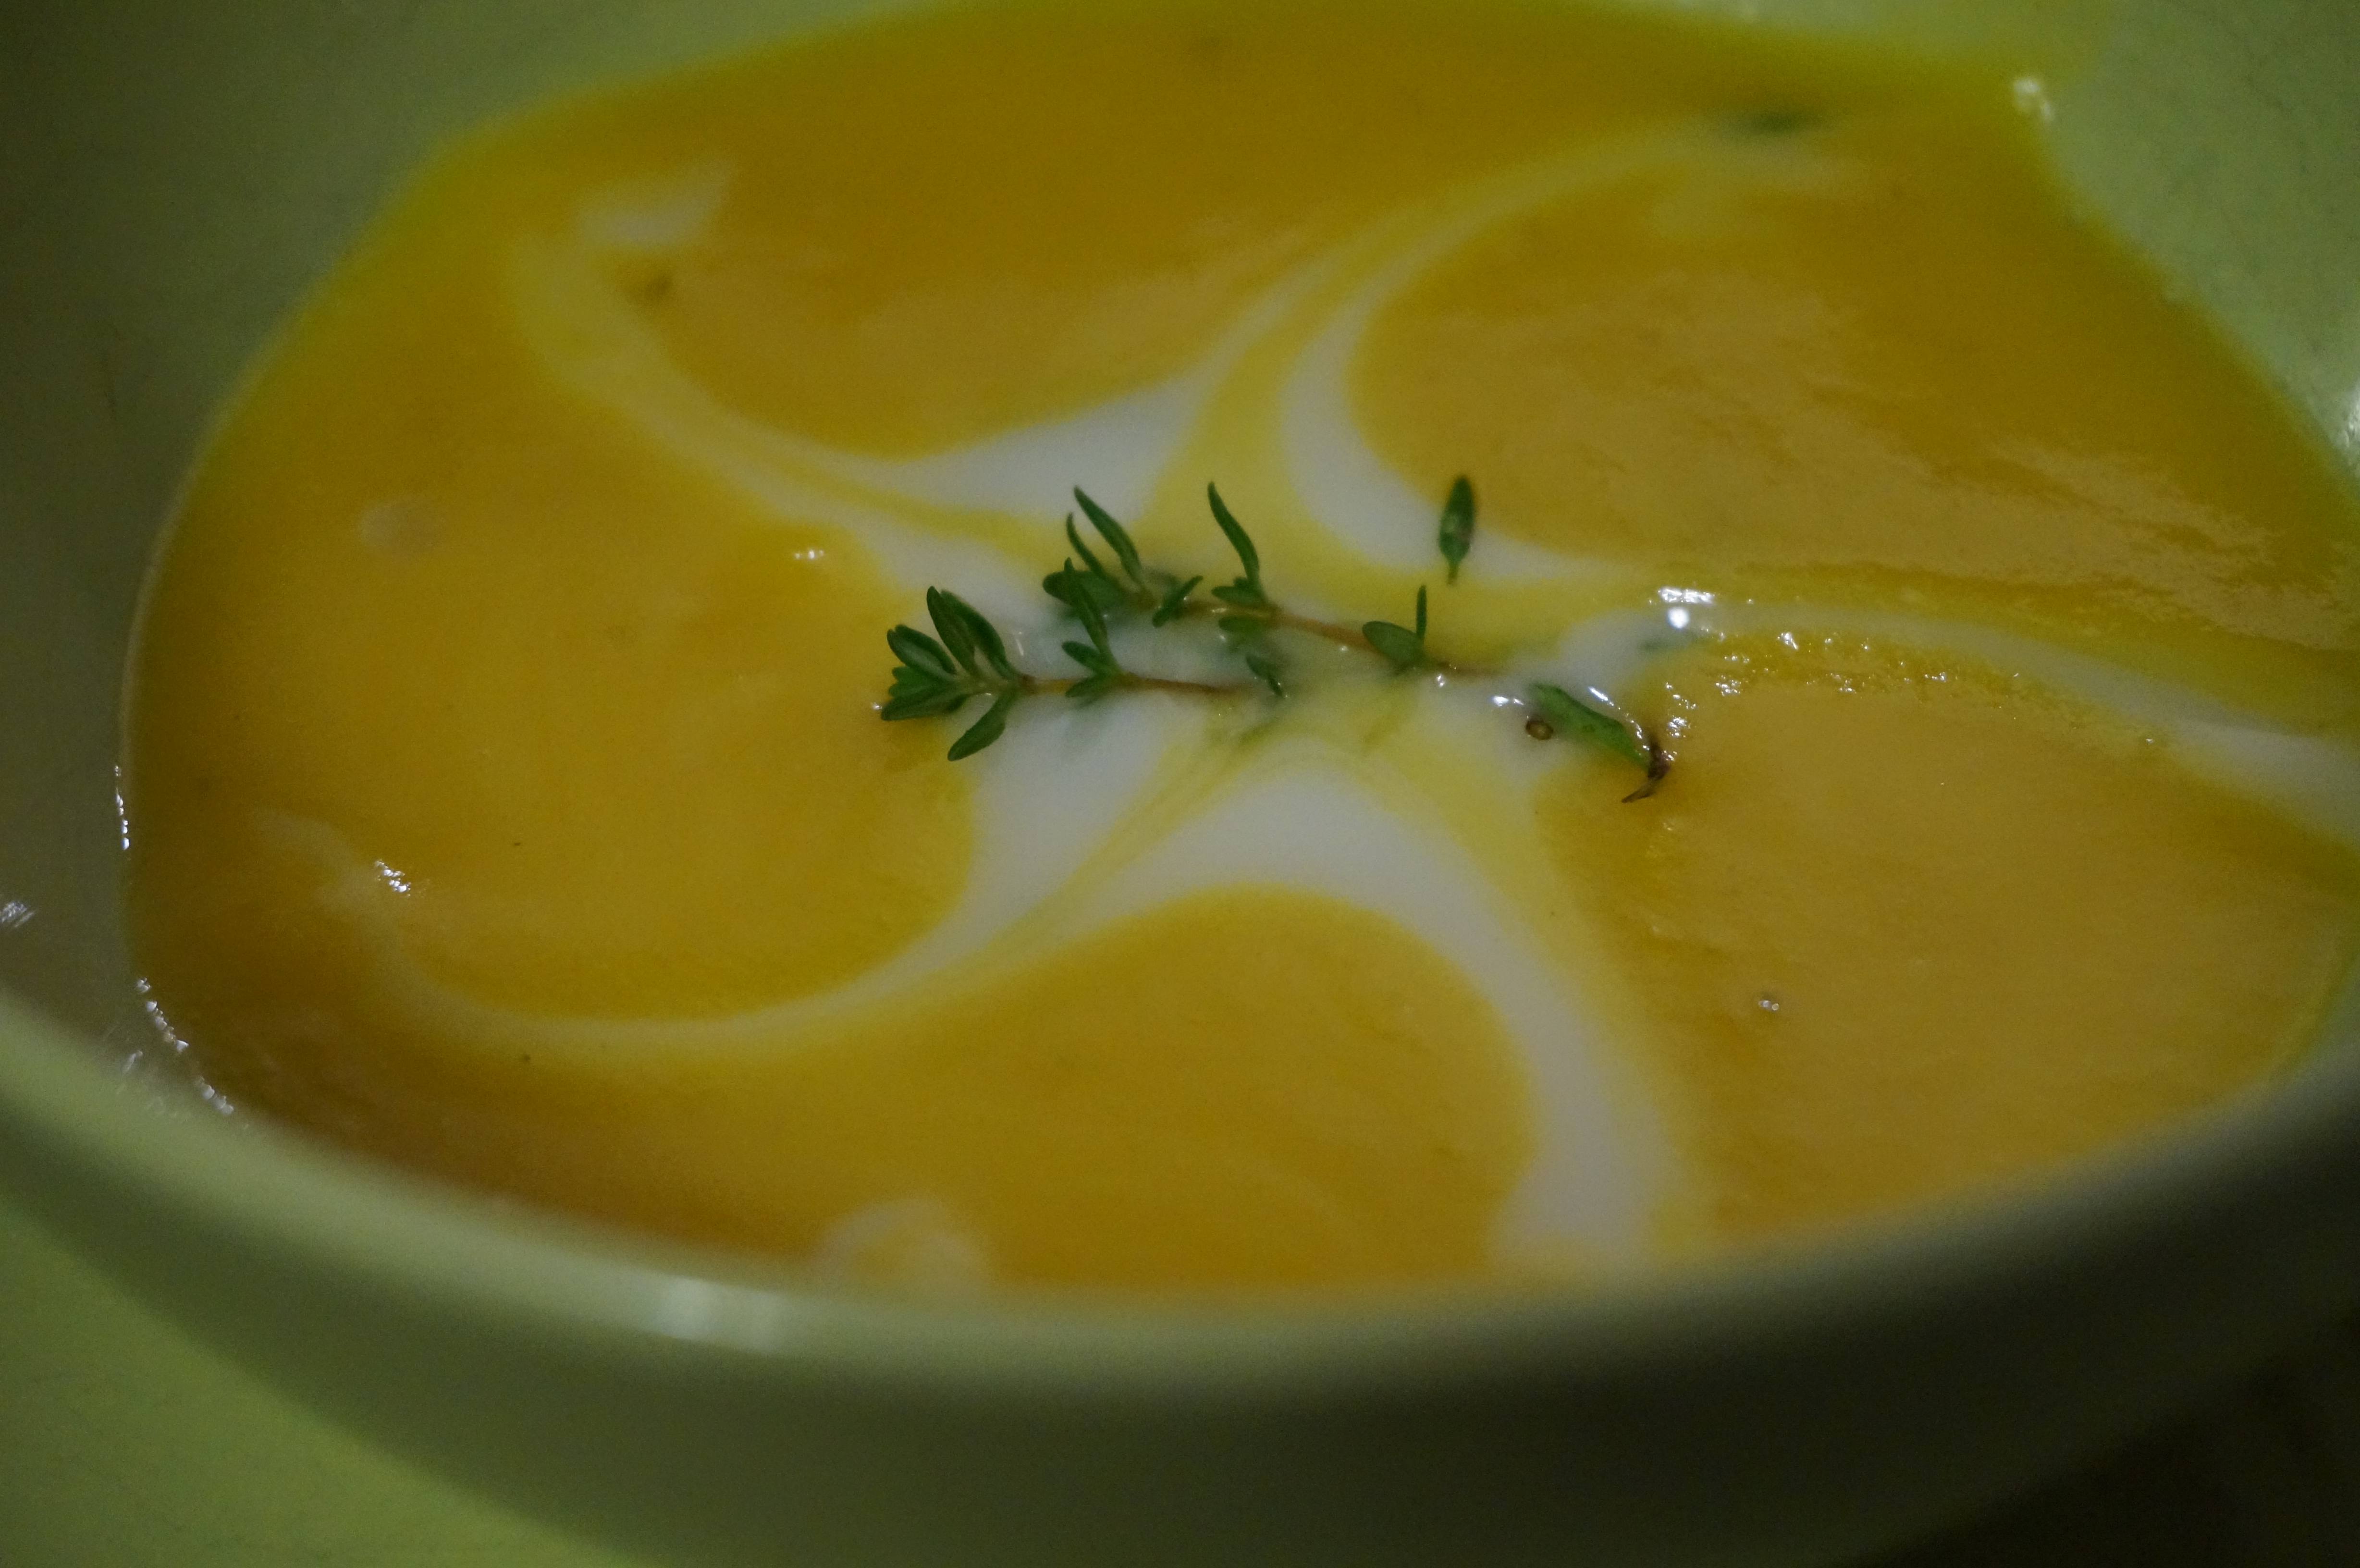
Blend till the soup is a creamy, rich yellow, and pour the blenderful into a large serving bowl. Do the same for the other half, adjust for salt and pepper, and you’re done.
I like to add a spoonful of honey-thyme yogurt to each bowl. It looks pretty and adds a little bit of unexpected flavor to the soup. I served ours with very basic grilled ham-and-cheese sandwiches (no, I didn’t get to have cheese, I just got to inhale while it was cooking), and it was just marvelous. It’s just the right meal to enjoy while leaves are falling and the temperature is slowly dropping.


When I was growing up, I lived on a commune in Northwest Ontario (for those of you paying attention, this was both before and after the homestead/trapline but before being an Alaskan city girl). Anytime there was a gathering, there was iced tea. And, as I said, this was…a commune. There was always a gathering. By definition, we were, in fact, a gathering. I’m sure you can imagine we went through a lot of Lipton’s tea bags. We always made it the same way, starting with a great big metal pot half-filled with water on the back burner of the enormous stove. You had to carry the water to the pot from the faucet, both because it wouldn’t fit under the faucet and also because, once full, it was hard to carry. A big wad of tea bags floated on top after the water boiled, until someone judged it strong enough. Then, industrial-sized scoops of sugar stirred in with a wooden spoon. Haphazard squirts of lemon juice. Topped off with fresh cold water. Thoughtful tastes. More sugar. More lemon. Ooops…more water. Finally, perfection. That is, unless someone (who shall remain nameless – but it wasn’t me) accidentally scooped from the salt container instead of the sugar container, despite the black Magic marker label. Big oops.
I learned to make sun tea when I lived in Haines, Alaska (in, yes, another commune). I do recognize the irony of learning about sun tea in one of the greyest, dampest, chilliest (but also one of the most majestically beautiful) places in the world. When you live in Southeast Alaska, you take full advantage of every drop of sunlight you can get. And one thing that means is sun tea. Basically, you get a glass pitcher or jar – it needs to be clear – and put cool water and tea bags into it, and let it sit outside in the sun till it’s done. This has to be done in the summer, really, because you need the sun’s warmth to speed the process. You can make cold-brewed tea any time of the year, but if it’s cold out, you don’t bother with the sun or with putting it outside. You just set the pitcher in a semi-warm place and give it lots of time to steep.
Last week, we had weather in the 80s. I’ve never experienced this in October before. My Canadian/Alaskan soul thrilled with the warmth, and I realized that it was absolutely necessary to celebrate with iced tea. Now, I could have made basic iced tea with boiled water and Lipton tea bags, but where’s the fun in that? No, what I needed was something that tasted like a sunny day at the very end of summer. A little fruit. A little spice. This is my very favorite method of making iced tea:
Fill a clear glass pitcher with cool water. Clear, for the sun; glass, not plastic, to resist staining. Add 8 teabags for a half-gallon pitcher: one per cup. (If you’re making a whole gallon, you really only need 10-12 teabags, but for a regular pitcher I follow the one-per-cup rule.) Half your teabags can be plain black tea. Then, you need 2 bags of chai tea and 2 bags of peach or orange tea. Cover the pitcher to keep out bugs and dust. Put it in a sunny spot where rampaging puppies and preschoolers won’t knock it over. Let it sit until the water has turned a deep, rich red-gold color. On a really hot day, this can happen in under an hour.
I don’t sweeten my iced tea in the pitcher. I like to leave it plain, and let everyone choose their own level of sweetness. But if you’ve ever tried to stir granulated sugar into an ice-cold drink, you’ll know that this can be an exercise in refraining from flinging your glass to the floor as the grains swirl implacably round and round in the tea. So, while the tea steeps in the sun, I like to make a simple syrup. Really simple. Stir one cup of sugar into one cup of water. Heat it in the microwave until…well, until it’s hot. Let’s say 3 minutes. Give it a good stir and watch the last grains of sugar disappear. Pour the simple syrup into a bottle to keep in the fridge next to the tea. Depending on what I plan to drink it with, I like to add some citrus zest or fresh herbs to the bottle before pouring in the hot liquid. You get a lightly flavored sweetener that can be used in cocktails, too. (Ideas: fresh lavender, basil, mint, orange zest, a juniper twig…)
There you go. Perfect iced tea, sweetened however you like it, from a pretty bottle with a colorful coil of orange zest. Just what you need for an end-of-summer day. Below, some pictures of the procedure:


It’s amazing how something as simple as the whiff of a familiar smell from a yellow box with red lettering, or the glimmer of light through a dark amber liquid, can bring the memories rushing back. We always drank iced tea when we gathered… As I sat alone in my kitchen, looking at the sunshine through my glass, I remembered how far I’ve come and how much I’ve given up to be here. I don’t regret my choices. I have a good life. But when I lift a glass of iced tea, the memories rush back, and I so badly crave hugs from all the “aunts” and “uncles” and friends I left behind. I want to sit on the front porch of the big white house with whoever else happens by to snag a glass of tea before the crowds arrived, feeling the sun on my face as we gossip about who sat next to whom in church yesterday, who might possibly be expecting yet another baby, whether we might need to pick those peas again tomorrow…
Iced tea is the flavor of gathering, of family, of closeness. It tastes like voices raised in song, bodies swaying together like trees in a breeze as a family of over a hundred souls worship together. It tastes like the faintly scandalous square dances (“But the girls and boys will be touching!”), like bringing in the hay while dust hangs in the shafts of sunlight, like snapping beans in the kitchen while stories fill the air. It’s just a glass of tea. But for a minute – just a quick minute – I am so homesick I want to cry.
And I want to tell them all: I miss you. I love you. I promise I’ll come visit soon.
Save some iced tea for me, will you?
