I'm a temporarily staying-at-home mom of two living in Oregon, learning all over again (after 15 years of city life) how to garden, harvest, and put up food. You might see posts about baking, parenting, crafting, organization – anything that strikes my fancy!
There’s something odd about our place here in Oregon. There’s some quality that hints of eternal youth, of continual renewal and transformation. A touch of Eden, perhaps. Oh, not for us human residents — this magical spring of youth is reserved for our plants.
Take our wisteria vine, for example. Look up how to grow wisteria, as we did when we moved here a bit more than two years ago, and you’ll learn that wisteria blossoms in the spring and then fades. That’s the normal course of events. But not ours. Our first summer, it blossomed at least twice. The following year, it put out blooms at least four times (I lost count near the end), tender green buds appearing just as the flowers from the previous wave of color began to fade. This year, it’s currently in its fourth wave of blossoms, with the velvet-soft buds of the next incarnation now appearing. It will be September any minute now, but that wisteria is determined to flower ceaselessly.
Then there’s this lovely hellebore. It’s an early spring flower. This one appeared in late January or early February, a rich purple with faint greenish tinges. An earlier-blooming hellebore, which was a delicate white, bloomed in December and faded as this one was at its height. Another purple one lost its blossoms by May. But this one is still blooming. The purple color has faded, allowing the underlying green to take over. You can see the brown seed-cases in the center, and a touch of dry brownness along the petals’ edges. But this dainty, fragile spring blossom is still holding its own, refusing to die off. It’s August 30, and here it is.
The hellebore at Easter…
The hellebore at the end of August!
Our raspberry harvest was in June, just as it was last year and (to a lesser extent, due to neglect) the previous year. This year, after extensive work over the past two summers improving the raspberry bed, we had the best harvest yet. Naturally, I assumed that the June harvest was the end of it. Apparently I thought wrong. Yesterday, as I trimmed and weeded and supported young green canes, I found…this. A handful of tiny green almost-berries! Today, as I finished pruning dead canes and tying up young ones, I found two more plants that appear to be making new berries. I had no idea this was possible. I’m not sure it actually is — and yet, there it is, another piece of evidence that our home holds a few grains of the Soil of Youth.
We took a walk Sunday evening, Aaron and I and the kids. Niko and Sofia munched apples they’d filched from our trees and picked frothy blooms of Queen Anne’s lace as we strolled down our driveway to the lane — season-appropriate actions that were entirely expected for the end of August. What was less expected was what we found as we passed the plum tree at the end of our driveway. As we paused to examine a branch that overhung the driveway and needed to be trimmed, I gasped. “No way!” The branch sported a twig inexplicably laden with flowers. That’s right. Plum flowers! In (nearly) September!
This next one is, I think, actually appropriate to some varieties of strawberries — a second, smaller, crop of berries in late summer. A couple of weeks ago, we noticed blossoms in the bed of strawberries that was originally here before we moved to this home. This week, we’ve been picking the occasional berry to snack on. It’s a delightful, probably normal feature of whatever variety these plants are, and I halfway expected it. What I didn’t expect was for Niko to find a red, ripe berry in one of our new Hood River strawberry beds — a variety not known for producing a second crop! Once again, magic has touched our garden. (Most likely a seed or runner crept over to the neighboring bed from the twice-bearing bed…but I prefer the more magical explanation.)
I’ve been told that lavender, promptly harvested, can produce a second wave of flowers. The past two summers, I harvested the buds just before opening for the most fragrant bouquets, carefully hanging and drying them — and waited in vain for a second crop. This year, an extended wave of migraines kept me indoors for the peak lavender harvesting time (you can blame them for my lack of blog posts, too). I finally managed to trim the flowers as they were fading, long after the ideal time, and tossed most of them into the compost. Since some of them had already gone to seed, I expected no further flowers from them. And yet, here they are, weeks later, a charming display of dainty buds and flowers.
When I was growing up in Northwestern Ontario, most of the roses around our place were wild roses. All of them, wild or domestic, were spring flowers. Once the summer heat arrived, they were done blooming. Here in Oregon, it’s a different story. As long as dying flowers are kept trimmed, these roses will produce flowers until the first frosts. I know it really is normal for this area — but it thrills me every time I look out at our rose bed filled with vibrant color!
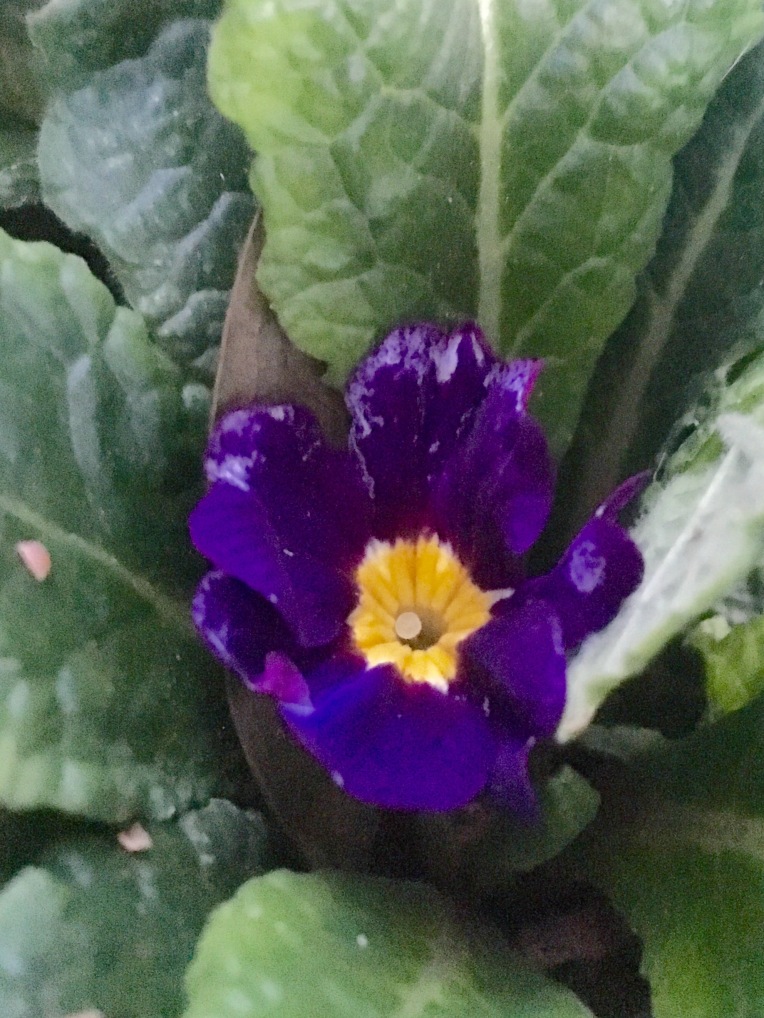
Last week, I decided to tackle some overgrown shrubs that provide shade along two small ponds and screen the lawn from the driveway. As I trimmed and hauled away branches, I leaned down to pull a few weeds from the shady pond garden — and there, nestled in dark green leaves, was a purple primrose! In the spring, that primrose plant had provided a splash of color in that dark corner, with multiple blooms, but of course the flowers faded as summer approached. Maybe the overgrown shrubbery had provided enough shade that this plant was tricked into thinking it was still spring. Who knows? All I know is that it’s one more example of the magical, eternity-tinged properties of our garden. A slightly faded, bug-eaten example, but come on! A primrose, at the end of August? That’s got to be real garden magic. Whatever the reason for the magic touching our home, I’m grateful and delighted. Grateful for the beauty, grateful for a respite from pain that allows me to enjoy it, and grateful for our life here in the country after too long hemmed in by a city’s concrete. Delighted by the surprises I encounter nearly every day.
Applesauce! It is the very easiest, fastest, and one of the most delicious ways to preserve apples. It’s great whether you have a couple of trees’ worth of apples that you need to take care of in a hurry, or you want to take advantage of your local grocery store’s super sale on fruit, or you just have a sudden hankering for some smoothly stewed, lightly spiced fruit. One reason I love making applesauce is that there’s so little waste: I stew the apples without peeling or coring, and sieve the coarse pieces out in the final steps, so all the delicious apple flesh is saved — unlike in other methods, when some flesh necessarily is thrown out with the peel and core. You can make a big batch, as I do, to make canned applesauce (I end up with about six pints), or reduce the size and make just a small batch to keep in the fridge. Either way, the basic process is the same except for the actual canning.
Aaron is an apple-picking machine.
Monkey kids “helping” Dad pick apples.
A big apple harvest this year.
Fresh apples.
Apple season is about over at our home. We’ve had apples coming out our ears this fall (speaking figuratively, of course), and I’ve used a lot of them in dried apples, jam, fruit leather of various types (all including apples), and an earlier batch of applesauce. A week ago, Aaron informed me he was commandeering the remainder of our apple harvest for pressing juice to brew a “hoppy” cider, so I preempted the coming reduction in produce by gathering a collection of attractive ones to make one more batch of dried apples and a batch of my own recipe of Harvest Apple jam, and filled a big pot with apples for a cooking up a final batch of applesauce. Today I’m finally finishing that one last batch of applesauce (the stewed apples have been sitting in the fridge while I’ve been battling a week of migraines), and now I’m sharing with you this easy, scrumptious fall-time favorite. Mmmm, mmmm, good! Oh, and in case you wondered, I left plenty for Aaron. He got four gallons of juice for his cider.
Grinding the apples into little chunks for pressing.
Aaron’s cider press.
A carboy full of brew working away.
Before I launch into the applesauce recipe, two disclaimers, if you will. First: despite my background, growing up in a subsistence lifestyle — living alternately on a religious commune, a trapline, and back on the commune — and spending that time baking and cooking and preserving for all I was worth, I am not an expert on canning and preserving. I was a kid during that time, following other people’s instructions. My memories are a bit foggy, and I don’t have recipes from back then. My knowledge comes from picking my mom’s highly experienced and knowledgeable brain, begging my gardening and cooking friends on Facebook for advice, reading cookbooks like The Ball Complete Book of Home Preserving, scouring the Internet for ideas, and obsessively reading the FDA and USDA’s online pages and various university-hosted pages on home preserving safety, methods, and recipes. I’m sharing my newfound knowledge with you because I’m having so much fun learning about canning and making food, and I’m the kind of person who can’t not share what I know. Once a teacher, always a teacher — and combined with a predilection for writing, this is what you get. This blog is a record of my journey in gardening and home preserving, not a declaration of my expertise.
Second: Despite not being an expert, I have done my research. Recipes like this depend on a certain acidity level to be safe for canning. If you wish to modify my recipe, please please please do your own research before changing it in some way such as adding large amounts of water or mixing in other fruit. Apples are safe for canning on their own, without adding lemon juice for acidity, but if you want to change things up, make sure you check out some of the links I provided above before you do anything drastic.
And now some general words on canning. Those of you who have read others recipes of mine, you know how I operate: I explain stuff a lot. I’m an overexplainer. If you want to skip all that, just scroll. Keep scrolling. A little more… There you go. You’ll find the actual applesauce recipe and processing instructions near the bottom. You’re welcome. (But don’t blame me if you miss something essential as you skim downward.)
Before you begin, make sure you have all your tools and materials ready. For this type of canning — called water bath, boiling-water, or hot pack canning — you don’t need a real pressure canner. You just need a pot big enough to hold all your jars, with a rack on the bottom to elevate them so they don’t contact the pot, and deep enough that the water can cover the jars by a full inch with plenty of room to boil. I do use a pressure canner, because it’s hard to find another pot that’s big enough to fit the above criteria, and because it makes me feel like I’m doing something exciting, but I have so far never used it for pressure canning — I just use it as a giant pot for boiling water. I’ll be honest: the idea of actual pressure canning scares me. It would scare you, too, if you’d ever walked into a kitchen covered ceiling to floor in exploded jar and green bean fragments.
You need a few tools besides the large pot or canner, too. You can get most of these together in a set at a farm store like Wilco, at your local grocery store during canning season, or in an online search at many shopping sites. Besides your jars, the most essential tool is a set of canning tongs. These tongs have a curved, rubberized gripper that’s just right for grabbing hot jars and moving them in and out of boiling water, and the positioning of the handle is such that you can pour water out of them after sanitizing without scalding yourself. As I said, essential. Nearly as essential is a wide-bottomed funnel, which will help you fill jars without drips.
A less important, but still handy, tool is a magnetic lid lifter (useful for lifting flat lids out of hot water when you’ve sanitized them), or — my preference — a lid rack with a long handle, which you can lower into the recently-boiled water in your canner after sanitizing your jars, while you fill them. You also need something with which to release air pockets when you’re making foods like pickles, though it’s slightly less necessary with something like applesauce. A canning set comes with a flat plastic tool for this purpose, with one end notched for measuring the space at the top of the jar in case you’re obsessed with perfection. A butter knife works perfectly well if you don’t feel like purchasing a whole set of canning tools.
Jars, of course, are truly essential. For our family, pint jars (either widemouth or narrow-mouth) are just right for applesauce — I’ve found that if I use quarts, we use about half a jar immediately once one is opened, and then it sits in the fridge and molders. We end up wasting a lot that way. So I sacrifice a bit of shelf space and use the smaller pint jars. In terms of canning safety, it really doesn’t matter whether you use pints or quarts.
To can safely without risk of bacteria growing in your food, you need to start with sanitized jars. A lot of people recommend sanitizing your jars in the dishwasher, but I don’t like this approach, and here’s why: 1) If your dishwasher is running to sanitize your jars, you can’t use it to hold your dirty dishes while you prep your food. 2) You need to heat your canner full of water anyway so that you can water bath your jars full of food, and you might as well take that energy to sanitize the jars at the same time. 3) Your dishwasher doesn’t get as hot as a boiling pot of water. If your jars aren’t thoroughly sanitized, you need to process the food-filled jars longer — and the less you process the food, the better the flavor and the quality.
That’s why I start my canning sessions by placing my clean, lidless, pint jars into the canner –as many as the recipe suggests (in this case, six) plus another one just in case — and filling the jars and canner with water to at least an inch above the top of the jars, making sure there’s room for the water to boil. Then I put the lid on, place the canner on the largest burner, and turn the heat on high. It takes quite awhile, on my elderly cooktop anyway, for the canner to heat — sometimes I’m nearly done prepping the food before it’s done heating. When it does boil, I turn the heat down a bit and make sure it boils for at least ten minutes before I turn the heat off.
I leave the jars in the canner to stay hot, away from dust, and out of drafts until I’m ready to fill them. They need to stay hot because you’ll be filling them with hot food; you don’t want to pour hot food into cool jars, because there’s a chance they could break or become stressed (and break later). Ditto with hot jars sitting in a draft. You want them away from dust because dust can disrupt a good seal. So just leave them in the canner, where they’ll be safe, and you’ll have more counter space for working as well. Win-win.
Unlike the jars, you don’t want to boil the lids — boiling can degrade the rubber seal. If you have a nice lid rack like mine, you can lower the lids into the canner after you take the jars out, or once the canner stops boiling if you have room in the canner. This will sanitize them as much as they need, and will soften the rubber to ensure a good seal. If you don’t have a long-handled rack, put the lids into a shallow dish, pour some of the hot water from the canner over them so they’re all covered, and let them sit while you fill the jars. This is where that magnetic lid lifter comes in handy, so you can lift them out without burning your fingers. Otherwise, of course, you can pour the hot water off right before you’re ready to put them onto the jars.
Lower the lid rack into the hot water.
The lid rack is a convenient tool.
On the topic of jar lids: I’m a very thrifty person. I reuse whatever I can. The one thing I don’t reuse is flat jar lids for canning. Why? Because I know that the heating process the lids undergo when the food-filled jars have been boiled for canning will begin to degrade the rubber seal. It may not be visible immediately, but it’s happening. Reused jar lids may seem to seal just fine, but might slowly lose their seal over time as the jars sit on the shelf, allowing the food to spoil. If this happens, the best-case scenario is that you lose your hard-won preserved food; the worst-case scenario is that the spoilage doesn’t leave any noticeable signs, and your family gets sick with food poisoning. So, please don’t reuse your jar lids. Additionally, as you’re counting out your brand-new, unused jar lids, check the rubber seal for any damage. If there are scratches or bubbles in the seal, throw them away. And if you, like me, save your used lids for casual food storage, double-check that you don’t have any damaged lids that accidentally got mixed in with your brand-new boxed ones — if the lids are bent or warped in any way, throw them away.
A tiny dent in the edge of the lid: bad. Throw it away.
A bubble in the seal: bad. Throw it away.
The rubber seal is intact, but there’s a big dent across the lid. Throw it out!
You need one more tool for making applesauce that’s not part of the general canning tool set. Exactly what this tool might be depends on your budget and the frequency with which you do this sort of thing. You need something for squashing apples. If you use my approach of not peeling or coring, you need something like a Foley food mill, a Kitchen Aid (or whatever brand you prefer) fruit and vegetable strainer attachment, or a chinois. If you don’t want to invest in a special tool, you could just use a potato masher or a blender — but you’d need to start by peeling and coring your apples first. Last year I used a food mill, and it was much better than my previous approach of pressing the apples through a sieve with a wooden spoon — but it was still fairly labor intensive. This year we splurged on a set of Kitchen Aid attachments, and using the fruit and vegetable strainer attachment has been heaven: so easy.
One way to process the stewed apples: a Foley mill.
A chinois food strainer
The inner workings of the fruit/vegetable strainer
Now that you’ve patiently endured all my thoughts on canning, you’re ready to make applesauce! Start by collecting your fruit, about 8 pounds of apples. Eight pounds of whole apples fills up my tallest cooking pot to the brim, which is exactly how I determined how much I needed for a batch of applesauce. It does not matter what kind of apples you use. It really doesn’t. If you use super tart apples, you can add a bit more sugar to sweeten it to taste; if you use sweet ones, use less sugar. My personal approach, since I’m using apples from our own trees, is to choose the ugliest apples: misshapen, bruised, dented, tiny, whatever makes them undesirable for other uses. This approach might work if you’re buying from a U-Pick farm, too — you may be able to get a discount if you offer to take battered fruit off their hands. The point is, the appearance doesn’t matter for applesauce, and since you’re not peeling or coring, you may as well use up the ones that will be difficult or time-consuming to peel for other purposes. We have two trees, one that produces apples that might be Golden Delicious and one that produces pretty red apples with green streaks, much more tart than the yellow ones at their ripest. I don’t bother separating the two varieties for applesauce. I just choose the ugliest, and go from there.
Use the ugliest apples for applesauce.
I love the way the apples look freshly washed.
Begin by cleaning the apples thoroughly: give them a rinse, and then fill your sink with water and dump the apples in for a good soaking. Even an organic orchard uses some kind of pesticide; just because it’s approved for organic use doesn’t mean you ought to eat it. Besides, who knows what kind of bug poop and bird spit might be on there? So wash those apples, no matter where you got them.
If you don’t have a tool for straining the peels, cores, and seeds out, you’ll need to start by peeling and coring the apples, in which case I strongly recommend an inexpensive ($20) tool like this:
This year Sofia is big enough to turn the peeler’s handle!
Otherwise, just cut each apple into halves or quarters, even the tiniest ones, and drop them into your largest pot. Cutting them serves two purposes. First of all, it helps them cook down faster and gets the juice flowing and the flavors mixing. Yum. But — and more importantly — it lets you see the inside of the apple before you put it into the pot. If you’re using beautiful, shiny, grocery store apples, this is a less crucial factor. If, however, you’ve chosen the ugliest apples from your own trees — or even fairly attractive ones — slicing them open is beyond essential; it is absolutely imperative. Allow me to illustrate:
Small, firm, no visible blemishes…
This is why you slice open every single apple.
Misshapen but perfectly fine.
While you’re cutting, keep in mind that they don’t need to be pretty. Bruises are okay. If you see a wormhole, just cut it out. If half the apple is bad, cut off the bad half and toss the good half into the pot. It doesn’t matter; it’s all going to cook down into mush.
When your apples are all cut and in the pot, give your pot a good look. Is there room for boiling and stirring? If not, now is the time to grab another large pot and dump half the batch into the second pot. That original eight or so pounds of apples, now quartered and bad parts cut off, fills my tall pot about to the handles, which gives me all the room I need to stir. If it were fuller than that, I’d need to cook it in two batches.
Pour in two cups of water to keep your apples from sticking and get the juices flowing. If you’re doing two batches, a cup in each pot is just right. Next, add no more than 1/2 cup of sugar for tart apples, or use 1/4 cup of sugar if your apples are sweeter. You could even skip the sugar and wait till the end to decide how much to sweeten your applesauce. I like adding sugar at the beginning because it helps pull the juice out of the apples, which in turn creates more liquid in the pot, making the apples cook down faster. Add 1 tablespoon of cinnamon and 1 teaspoon of nutmeg. Other spices that might go well with applesauce, but that I don’t usually use, are allspice, cloves, and ginger. I generally just stick with cinnamon and a dash of nutmeg so that the fresh taste of apple is the starring flavor.
Sprinkle in some sugar.
Add cinnamon before cooking.
Stirring the cooking apples
Set your pot on the stove on high heat with a lid, give it a stir to mix in the sugar and spices, and let it heat until you hear boiling. Give it a good stir, bringing the soft apples up from the bottom and letting the firm ones on top drop down. Turn the heat down to medium and let it keep on cooking, covered. Stir it thoroughly every fifteen minutes or so. You’ll know the apples have cooked long enough when they are uniformly mushy, and none of them hold their shape when poked. With a giant pot like I use, this takes about an hour. If you use smaller pots it won’t take as long.
When your apples are cooked, this is a good time to start your canner and jars heating as I described above.
Let the apples cool just a little before you sauce them so you don’t get burned. Put them through whatever type of food mill you have, or — if they’re peeled and cored — mash them up, or puree them in small batches in the blender. If you’re using the blender, fill it no more than halfway; drape a towel over the lid; hold the lid down very tightly; and start the blender at a low speed before moving up to puree speed. Pureeing hot food in a blender can be a trifle hazardous if you don’t take precautions.
If you’re using the Kitchen Aid fruit and vegetable strainer attachment, here’s some advice: No matter how badly you want to try reusing the rejected coils of apple junk that oozes out of the end of the attachment, do not — I repeat, DO NOT — put that stuff back through the strainer. You may think you can be extra thrifty and get some more applesauce out of it if, perhaps, you mix it with water to soften it. No. Don’t do it. You will have strainer pieces flying across the kitchen, fruit splattering your cupboards and counter, and rock-hard fruit matter that you’ll have to pry out of the innards of the strainer. Just don’t. I know that if you grew up in a family or culture that reuses everything and throws out nothing, it hurts to see that apparently useful fruit in the bowl waiting to be thrown out. If it’s too much to bear, find another use for it. Feed it to the chickens. Let the puppy eat it. Just…don’t put it through the strainer a second time. Baaaaaad idea.
Pressing the stewed apples into the strainer
The setup for processing the applesauce
The inner workings of the fruit/vegetable strainer
Apple leavings: soft pellets of peel and core.
Applesauce.
However you achieve your transition from stewed apples to applesauce (and I highly recommend the Kitchen Aid strainer; I think a good, sturdy chinois would be second-best, with a food mill like my own coming in third), it’s now time to taste and reheat. This is the time to decide whether you want more (or any) sugar, if it needs more cinnamon, et cetera. These decisions don’t affect canning safety. You can sweeten and season to your heart’s content. You’ll find, I think, that most apples need very little sweetening; a quarter to a half cup of sugar for eight pounds of apples really is about right.
As you ponder sweetening choices, you should be reheating your applesauce. Bring it to a boil over medium-high heat, then turn it down to medium and let it boil gently, stirring occasionally, for a minute, paying attention to consistency. If it’s very thick and gloopy, drizzle in a bit of water until it’s smooth, continuing to heat it till it’s come back up to a boil. I realize this sounds vague and imprecise. That’s because the thickness of the applesauce will depend somewhat on the variety, ripeness, and quality of your apples. So you may need to add a little water, or you may not need to add any at all. Just make sure it’s easy to pour and boils easily without making big thick pops; otherwise it may not heat evenly in the canner, and you can’t be sure it’s been heated all the way through to a safe temperature.
Once the applesauce has boiled, lay a towel out on your counter — remember, it’s not a good idea to put hot jars onto a cool surface — close the window — because hot jars don’t like drafts — and lift the jars out of the canner onto the towel. Keep the water at its original level in the canner by pouring some of the water from the jars back into the canner, and some out into the sink. If you have a long-handled lid rack, lower it into the hot water once the jars are out. If you don’t, pour some of the hot water from a jar over the lids in a shallow pan.
Use a wide-bottomed funnel to guide you as you pour the applesauce into each jar, leaving 1/4 inch of space at the top of each jar. If you’re not sure you’re leaving enough headspace, this is a good time to use that notched green tool that came in the canning set you may have bought. You can also now use that tool to give each jar a zig-zag stir, to release any air bubbles inside. Or you could just give each jar a couple of good thumps on your toweled counter. If necessary, top off any jars that had large bubbles and have now lost fullness. By the way: Do you see how thick that applesauce is in the photos below? Notice the bubbles in the jar? That applesauce is just a trifle too thick — not so much that I was in a panic upon noticing it, but really I should have thinned it as I explained two paragraphs above to make sure it heated evenly in the canner.
Use a wide-bottomed funnel to fill the jars.
Carefully wipe the edges.
Jars of applesauce.
Get a damp paper towel or clean cloth. Carefully wipe the rim of each jar, using a fresh area for each jar, making sure there are no stray splashes of applesauce remaining on the edge that could disrupt the seal. Once all the jars have been wiped, place a flat lid onto each jar, checking for flaws as you go and discarding any that have problems (of course, you already did this once, but perhaps you’re as paranoid as I am). Then place the rings and tighten them down. Turn the heat on under the canner, and use the tongs to lower the jars into the water. Replace the lid and bring the canner back to a boil.
Process the jars for ten minutes. Just to be clear, the timer for water bath processing begins when the water boils, not when you put the jars into the canner. After ten minutes, use the tongs to pull the jars out and place them back onto the towels. Do not touch the tops of the lids. You should hear the gentle, musical pop of lids sealing fairly soon, but some jars could take up to 24 hours. I repeat, do not touch them while you wait. If you push the center down, causing a “forced seal,” it’s impossible to know whether that jar would have sealed on its own or not. So don’t touch them until they have all sealed and are thoroughly cooled, at which point you should be sure to write the contents and date on stick-on labels for each jar. Home-canned food can easily keep for a year.
If any jars don’t seal after 12 to 24 hours (or if you disregarded my stern command to not touch the jars, thus causing a forced seal), you have two choices. You could reheat the canner to boiling with the jars inside (I would gently unseal the forced-sealed ones first, using thumbs to push the lid off rather than a can opener, then put the lids back on), process for 10 minutes at boiling, and leave them again to see if they’ll seal. Or you could shrug and take what is most likely your single unsealed or force-sealed jar and put it into the fridge, where it will be the first jar of applesauce you’ll try out.
Applesauce is a perfect fall treat, but with apples available year-round in grocery stores, you could make this any time. It’s great for kids’ lunch boxes, as a side with roasted pork and sauerkraut, and myriad other uses. Enjoy!
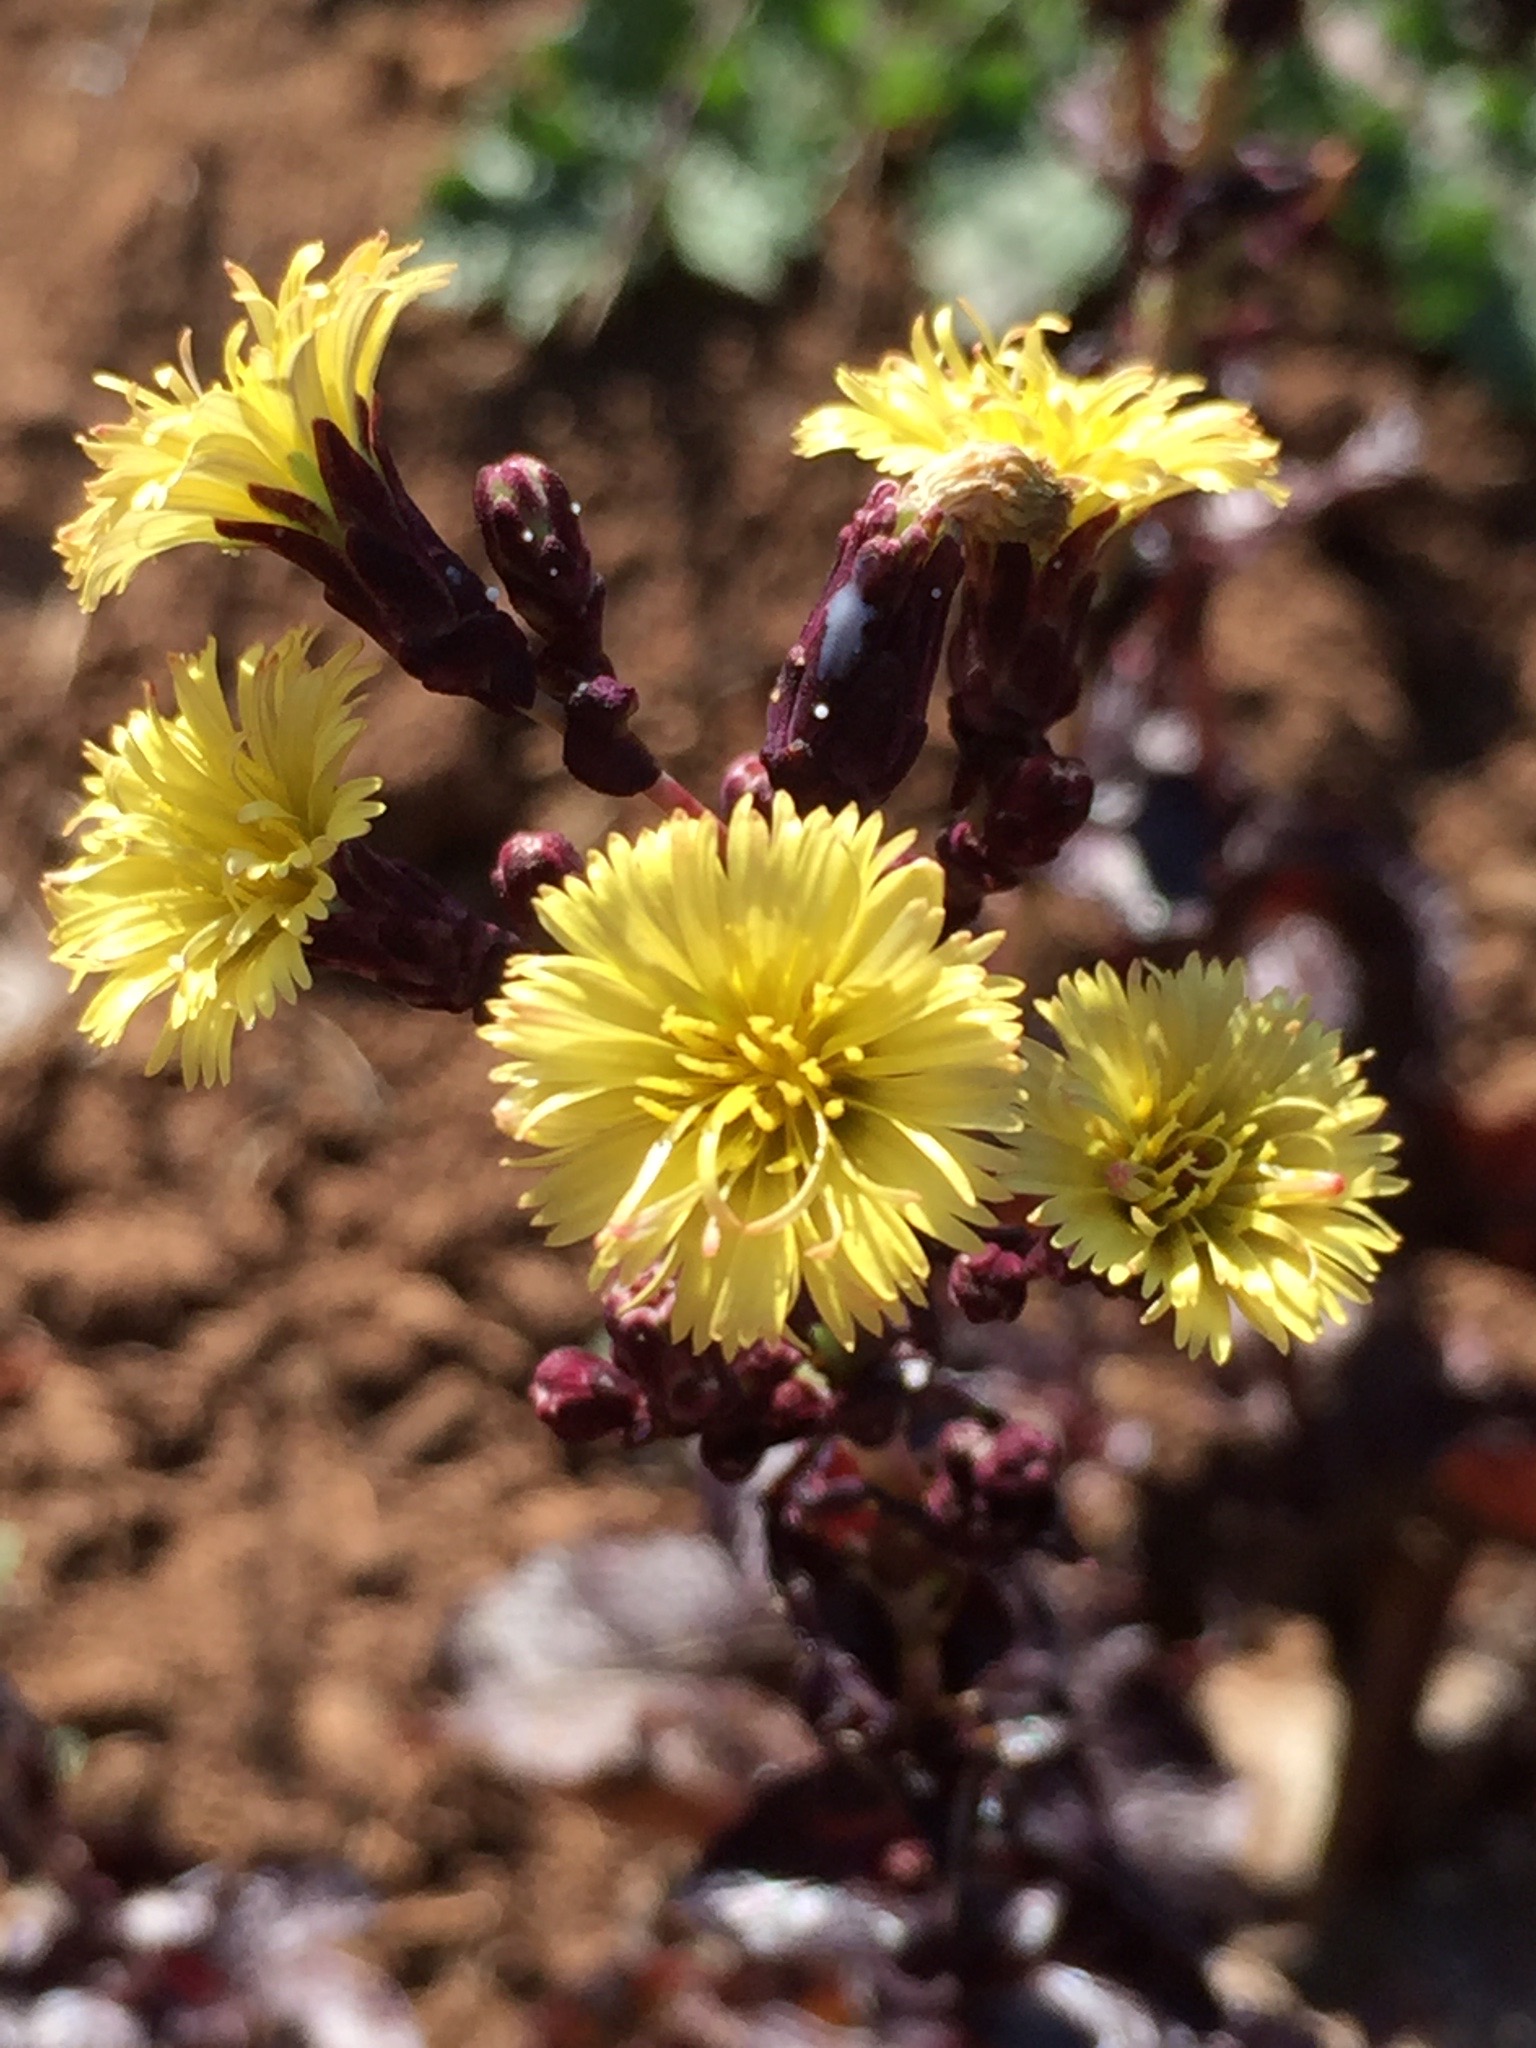
In a supreme act of sacrifice, I allowed all of my lettuces this year to bolt, and then further allowed them to remain in the garden and take up valuable space — all so you, dear readers, could see what happens when Lollo Rosso lettuce (a red loose-leaf) flowers. Some may say this was due to laziness. Others may speculate I merely forgot about them, allowing my memory to be consumed with the minutia of daily life. Whatever. Haters gonna hate. I’m sticking to my story: sacrifice, all for you.
Lollo Rosso lettuce flower
I always assumed, if I thought about it at all, that lettuce was somehow related to cabbage, which is a brassica, like broccoli and mustard. I have to admit, there was never any basis for this assumption. Broccoli leaves aren’t at all similar to lettuce, after all. I suppose my belief came from the similarity between cabbage and lettuce heads.
When cabbage and broccoli bolt, they make very tall stalks covered all over in five-petaled yellow flowers (yes, I’ve got some of those too). Not so with the lettuce. I was amazed to see these soft, aster-like, yellow flowers growing above the Lollo Rosso’s red leaves. They’re surprisingly decorative.
Lollo Rosso lettuce flower
Naturally, I turned to the ever-knowledgeable Internet to explore the mystery. As the appearance of their flowers suggest, lettuce is a member of the aster family, as are daisies and chrysanthemums. I had no idea. All this time, I’ve been munching edible daisy leaves in my salads and on my sandwiches. We might as well rename our bacon-lettuce-tomato sandwiches, BDTs. Or we could call them BATs (the A for aster, of course), and cut them into appropriate shapes as Halloween treats. I’m staggered by today’s garden discovery, as I’m absolutely certain you are. Aren’t you glad I made the sacrifice of that patch of garden so we could all learn this valuable new fact?
A few weeks ago my husband Aaron came in from the garden and said, “I turned your squash for you.”
“You huh wha bleh?” I said. I had absolutely no idea what he had just said.
“Your squash,” he repeated patiently. “You have a bunch of squash and pumpkin and melon things out there, and some of them are getting mildewy on the bottom. So I turned them.”
“Oh,” I said, still feeling a little bewildered. “Thank you.”
This would have made more sense to me if it had been a little longer since the recent episode that sent me to the ER and taught me the term hemiplegic migraine, but unfortunately one continuing effect of a major episode like that is that I sometimes have moments — less frequently as I gain distance from the attack — when ordinary things just don’t compute. Things like the word “squash” as related to the concepts of “garden” and “turning,” for example.
In any case, later pondering revealed the wisdom and kindness of Aaron’s action, and I thanked him with more cognizant gratitude. It also occurred to me that the squash and melons ought to be raised off the damp soil so they didn’t continue to mildew.
We had just received a shipment of iris rhizomes from a nearby iris farm, and they’d come packed in swirls of long slender wood shavings. The touch and scent of them had immediately carried my mind to my father’s wood shop, my fingers tangling in just such shavings as I breathed in the fresh sharp piney smell of the picture frames or chair legs or jewelry boxes being urged into beautiful forms by my dad’s skilled fingers on the lathe that he’d built himself. Those swirling shavings, I thought, might work to elevate our precious squash and melons above the damp soil.
Newly arrived iris rhizomes in wood shavings
By the way, I’ve been researching — not the real, blood-sweat-and-tears research of libraries and journal articles and interviews, just intermittent online searches — and no one else is talking about having to regularly turn their squash, or pile fluffy wood shavings under them, to keep them from mildewing. I’m pretty sure this is user error. That is, I’ve noticed that the soil in that garden is exceptionally clayey, and I haven’t done much about it. When Aaron helped me plant the squash, I told him they needed fertile and well-drained hills, so he made tall compost-filled piles for them, and they thrived. But the vines, of course, spread well away from the hills, where the soil doesn’t drain as well. So we’re getting standing water with the sprinkler, condensation even when we don’t water, and, sadly, mildew and rot if we don’t provide a bit of extra tender loving care.
User error, then, is why I’ve been piling shavings under all my lovely bright-orange Big Max pumpkins, my acorn squash, and my honeydew melons, and anchoring them (probably unnecessarily) with burlap for fear of strong winds blowing them away. Periodically I go out and check on the ones that were too small to worry about last time, and give them the wood-shavings treatment, and give my others a gentle turn while wiping condensation off. Now that the fall rains have started again — sort of — we’ve stopped watering that garden, but the squashes are still getting damp.
Big Max. So shiny! So orange!
Pretty honeydew.
The melons, lovely green honedews, are a source of pride, anticipation, and anxiety for me. Like the squash, I’ve never grown them before,and for some reason I’m really absurdly excited about them. One day in mid-August I spied one I thought seemed extra-large, and I picked it and brought it inside with enormously high hopes. Those hopes were mercilessly dashed. The melon was terrible. Hard, tart, but otherwise flavorless. Pretty, though.
Once again I turned to my speedy version of modern research. Ripe honeydews, I learned, have lost their skin’s soft fuzz and have shiny, waxy surfaces. They might sound a bit hollow if you tap them, and sometimes you can see veining on the skin. The blossom end should give a little when gently probed, and they should be fragrant.
That’s why, every few days, as I progress through the squash patch, turning, checking for mildew, supporting with shavings, I pause occasionally by a large honeydew. I glance surreptitiously around. I lift, probe gently, tap, sniff.
It’s moments like those that I feel a small sense of shameful relief that the home of our kind, sheep-raising neighbors, who almost certainly can tell a ripe honeydew at a glance, is just barely too distant for them to glimpse me wandering through the garden and sniffing the melons.
Late yesterday afternoon, after naps and just before dark, I decided it was high time I cleaned out the little pond behind our house. During our first big storm, it had filled with fallen leaves — at first they’d been piled up on top, but then they slowly sank until they filled the whole thing. For about a week and a half I couldn’t do anything about it because the leaves were all frozen in place, but now that everything had thawed, I had no excuses. I thought it was a job Niko could easily help me with. We would build good work habits, I thought. It would be stress-free because he really couldn’t mess it up, and if he wandered off briefly to play it wouldn’t be a big deal. And he would have so much fun. Water, fall leaves, a rake just his size — what could be more fun?
Fun, right?
I didn’t count on having to incorporate a conversation on death, decomposition, and the inability of dead goldfish to lie on their bellies.
I don’t know what exactly caused the fish to die. They were probably pretty badly traumatized by being among the last to be rescued from the muck when we cleaned out our big pond, which turned out to contain a HUGE school of goldfish, mostly in shades of black and brown. I’m sure having their entire pool filled with dead leaves didn’t help. Nor did the frozen surface do anything to relieve their difficulties. Combine those problems with the fact that this pond isn’t filtered or oxygenated with a little waterfall or fountain (because the sweet little waterfall the previous owners constructed is so leaky that the pool loses half its water within an hour), and you’ve got a recipe for disaster. Who knows at what point these poor creatures breathed their last?
I started scooping the leaves into the wheelbarrow with a large plastic rake while Niko fished for leaves with his. I thought the rake would be a better tool than the big net because it wouldn’t capture the fish. I needn’t have worried. I was about three scoops in when I noticed the Smell. Yes, it was bad enough to warrant the capital letter.
I checked the bottoms of my magenta mud boots: no dog poop. I eyed Niko suspiciously, but I knew it wasn’t him. He hasn’t had a poop accident in forever — even when we were potty training it was rare. On my back, Sofia bounced and babbled happily. Couldn’t be her: she does not appreciate a messy diaper.
Two more scoops, and the first fish bobbed to the surface, blanched and stiff, eyes bulging. I quickly fished it out with the rake, but I wasn’t fast enough. “Is that fish DEAD?” exclaimed my son. I confirmed that yes, it was dead, as I carried it to an out-of-the-way spot between a large tree and the fence. As we discussed NEVER touching dead things, the next one popped up. This one was deposited with the first.
After I’d carried two more on their long-handled bier to the tree, I gave up. As seven more fish rose to the surface, their rest disturbed by my scoops, I set them aside on a flat rock. They lay there, stiff, on their sides, a grotesque tableau of the Feeding of the Multitudes with just a few little fish (no loaves here).
Niko eyed them. “Are they dead too?” Yes. “Are they making that yucky smell?” Yes. “Can you make them go back on their tummies? I don’t like them like that. ” No, sorry. “Can I catch one with my rake too?” NonononoNO, absolutely NOT. No touching dead things! Even with a rake! “But you are, Mommy.”
All told, I scooped eleven dead fish out of there. I’m now terrified to clean out the smaller pond next to the garage, now. Three of those fish are nearly as large as my hand and beautifully golden-orange, plus numerous black-and-orange and plain black or brown ones. That pond was similarly filled with leaves and frozen, but it has the advantage of having a filter and a koi-shaped fountain for oxygenation. And the refugees from the big pond who ended up here were earlier rescues. They may have survived. But I’m not very hopeful.
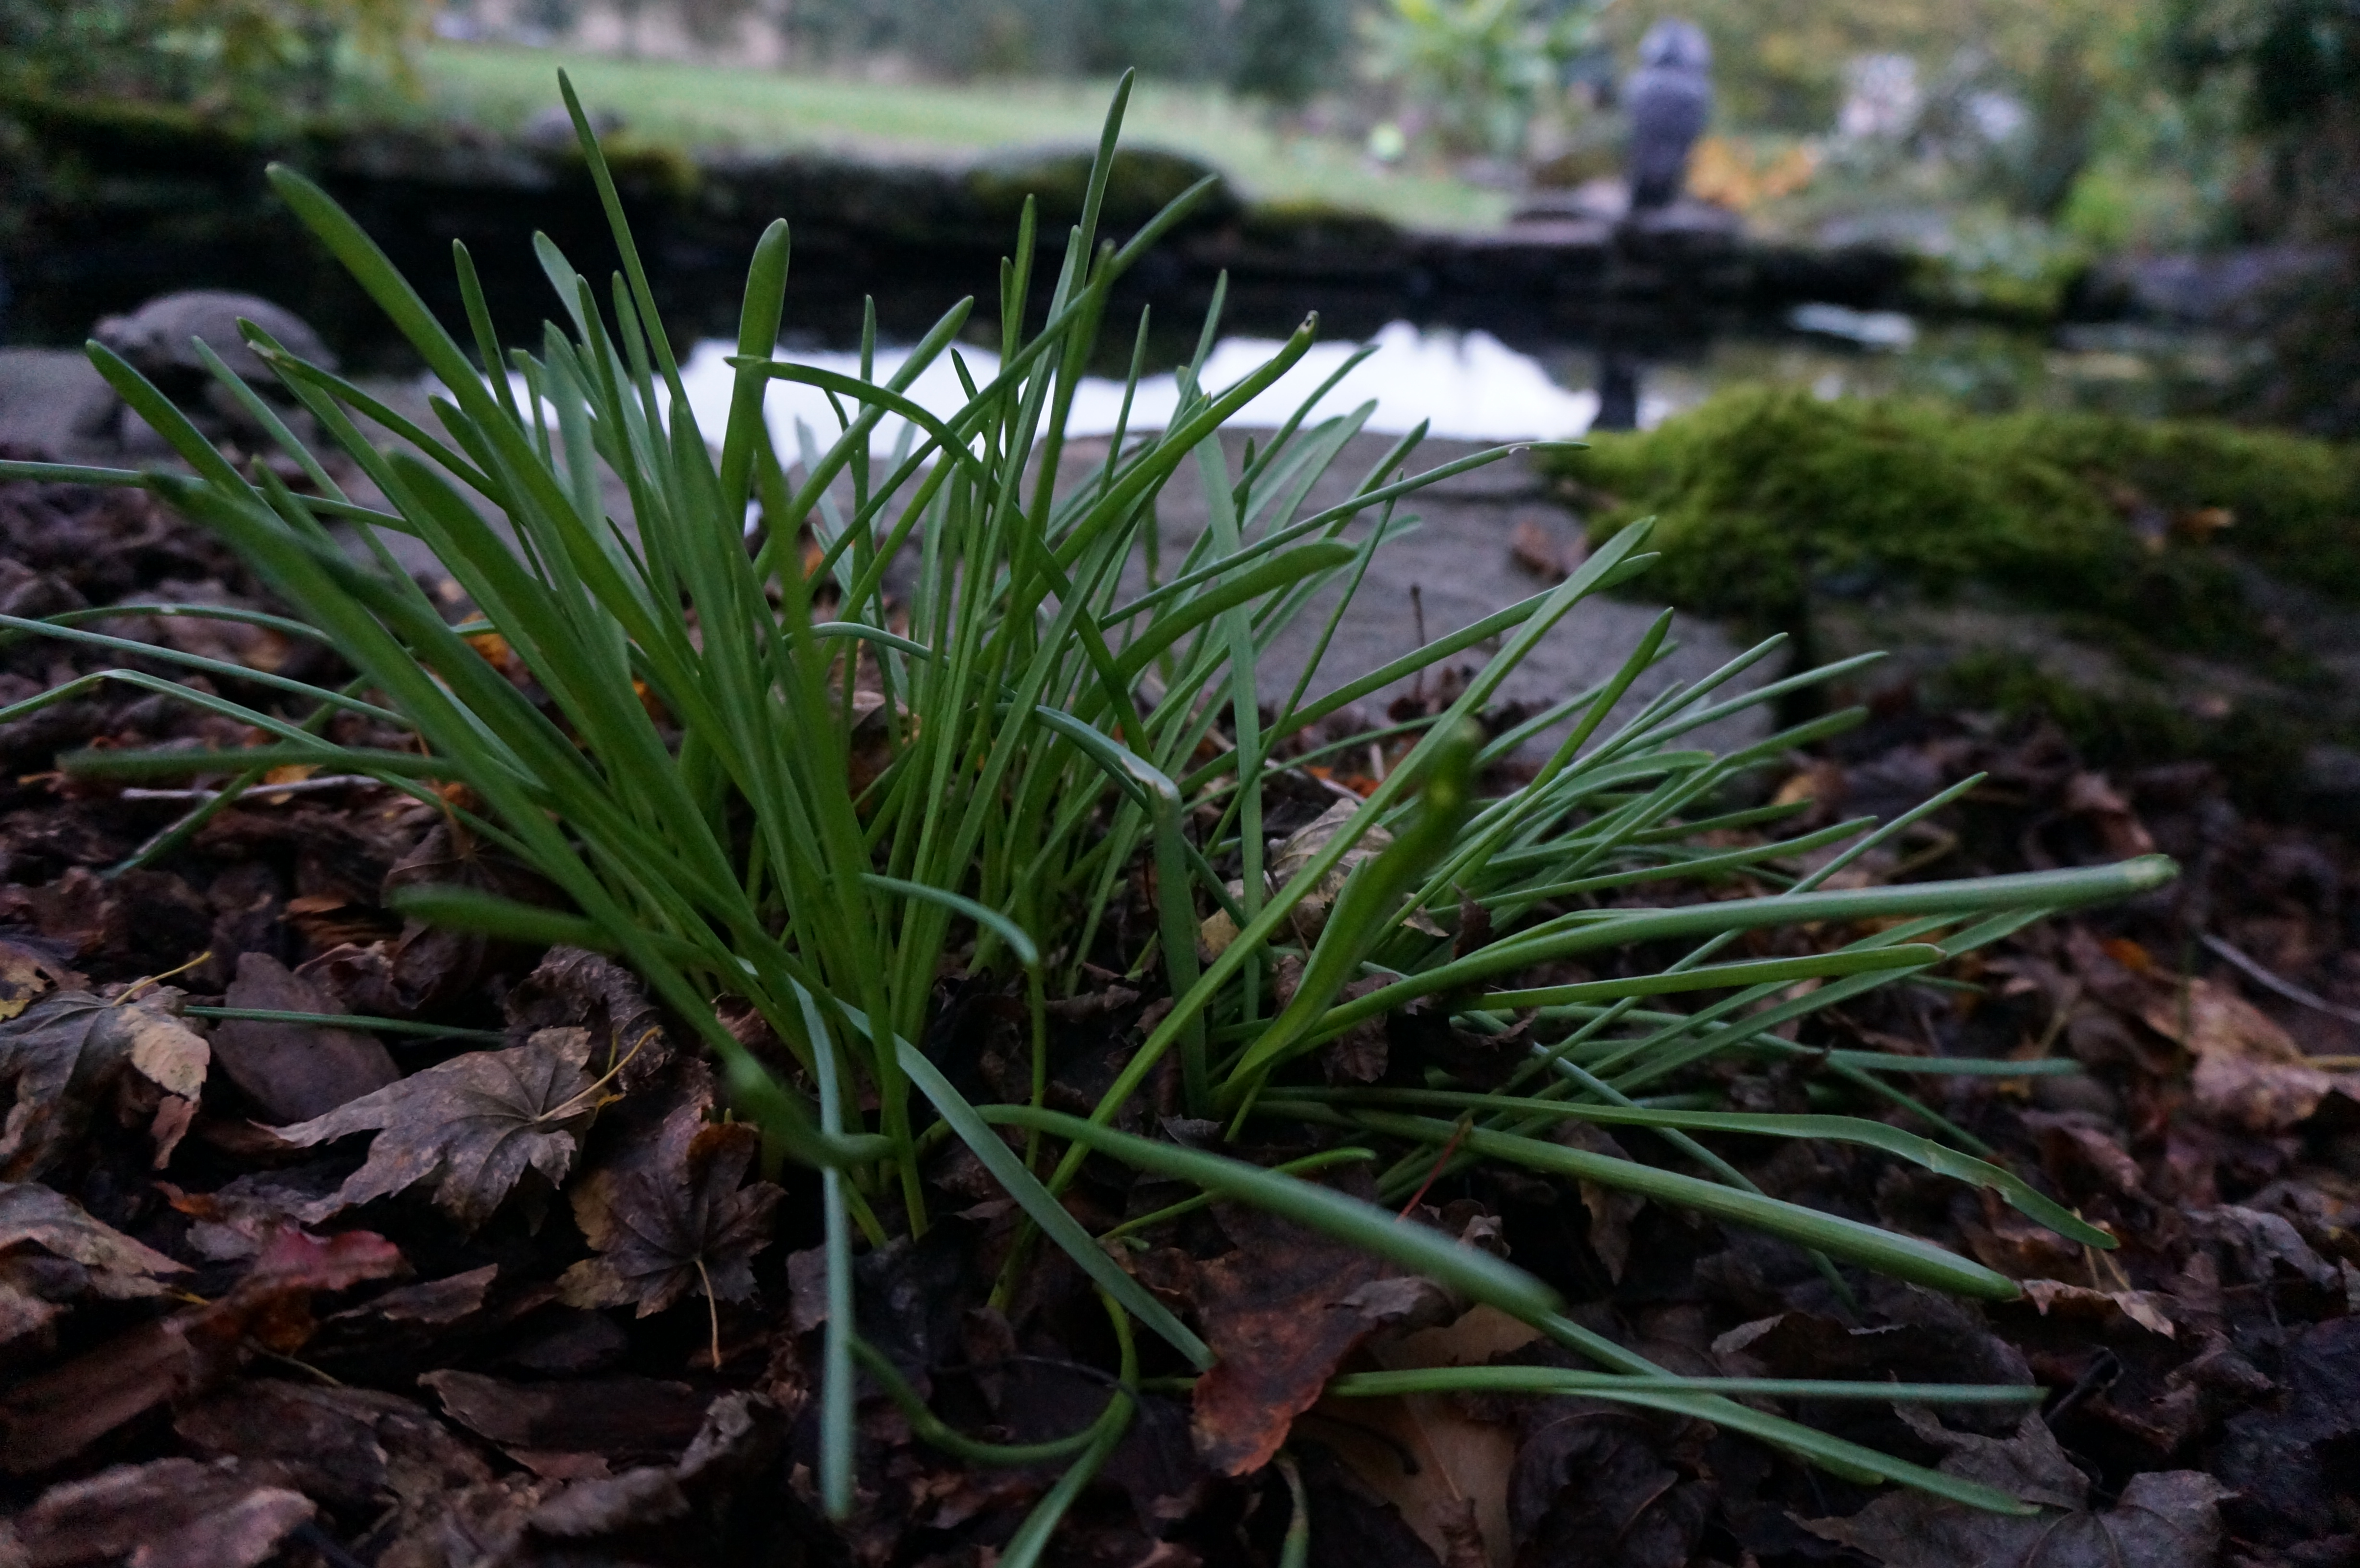
On the bright side, the onions? scallions? that I harvested last week and then forgot to lay out to dry did not rot, and I chopped up two for our chicken and dumplings that I made to cheer me up after having to dispose of eleven smelly fish. So…that’s nice, right?
Early last week we had a small ice and wind storm. It was worse in other areas — friends who live about half an hour away got actual snow, and their schools were closed. We got a pebbly ice coating on our porch and back door, a layer of ice on our ponds and plants, and leaves and small branches in drifts in odd places.
Frozen Crocosmia
Frosty grapes
Petunia
No idea what this pretty little flower is. It appeared last month.
Pieris Japonica
Heavenly bamboo, I think!
Vine maple twigs
Vine maple twigs
Golden-Crowned Sparrow with cold toes
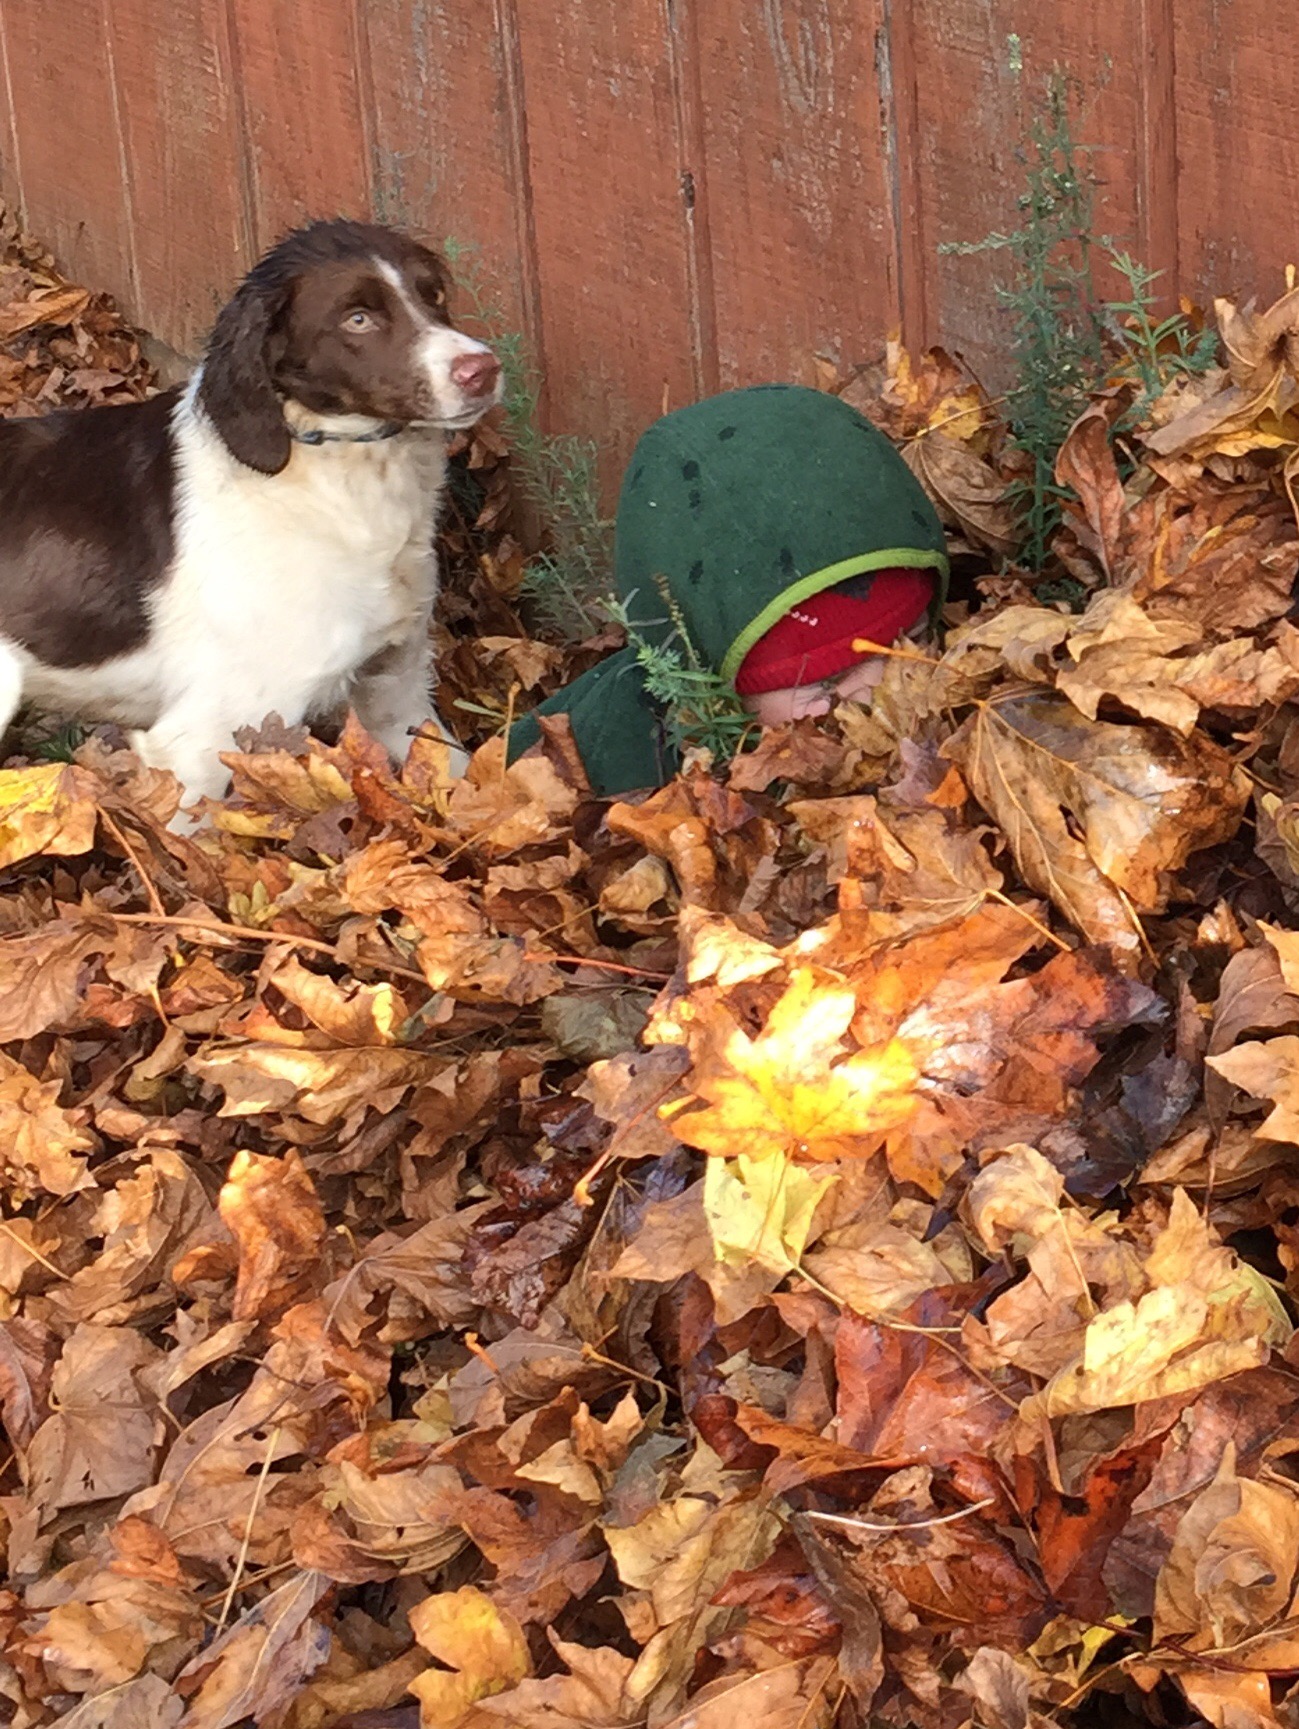
The leaves blew into big piles against walls and in corners, leaving the lawn mostly leafless. They piled up on the surface of the ponds. Our puppy, Cody, tried to walk through what appeared to be a pile of dry leaves and instead fell through them into the goldfish pond — a moment which, regrettably, I failed to capture.
Niko was thrilled by the leaves. Entranced. Giddy. We and the puppy walked over to the shed on Wednesday to finish storing water lily roots for the winter, and he stopped and stared when he saw the three-foot drift of leaves against the wall. “Mommy. Look! At the LEAVES!” And then, amazement turning to joy, he was in the pile, Cody leaping after him. He disappeared completely — all that was visible was his nose and the top of his head.
He spent a quarter hour leaping, running, tunneling through the leaves. Tossing them into the air and dancing under them. Flinging them at the dog and shouting with laughter when Cody, bewildered by the featherweight barrage, tried to dodge. So much joy.
Yesterday we did some outside work. I took care of uprooting dead green bean vines and cutting back the blackened dahlia stems and asparagus fronds. (Asparagus makes pretty red berries. I had no idea.) And Aaron got out our new leaf blower/vacuum/mulcher and cleaned up the giant piles of leaves.
Niko had been tagging around with Aaron, happy to be helping Dad, but while Aaron was getting the leaf vacuum ready, he was inside getting a drink. So he had no warning that his beloved leaves were about to disappear. We came around the corner of the house together to see this:
And poor Niko froze in horror, his mouth open, a look of panic on his face. Then his disbelief turned to grief and rage, and he started howling: “No, Daddy, NO! Please don’t! I WANTED TO PLAY IN THOSE!”
But between the noise of the engine and the headphones, Aaron couldn’t hear (and, having only a short time to work, would probably have finished the job anyway), and every leaf got sucked up and mulched. I guess Niko will just have to wait for the next wind storm.
What we’re doing today: rescuing root bound water lilies. Some of them were just buried in the muck at the bottom of our pond, which Aaron dredged out a couple of weeks ago — which is quite a story on its own. Those ones weren’t root bound, but they need to be trimmed, potted, and redistributed. I’m going to have far more than I can manage. Anyone want some water lilies?
I’m a northern girl by heritage but not, it turns out, by disposition. I was raised in the frigid winter climate of Northwestern Ontario and the deep snow of northern British Columbia, then migrated to the somewhat milder Anchorage, Alaska. Every year since I was old enough to take notice, I’ve hated the long, dark winters of the north more and more. After the excitement of the winter’s first flakes and drifts, snow is just one more way for my feet to get wet and cold. Watching the sun set at 3:30 in the afternoon as I wave goodbye to my students. shivering, is not my idea of enjoying the majesty of Alaska’s nature. Searching for a dry, snow-free spot to sit at the end-of-school picnic in May brings me no joy. No, beautiful as Alaska is, it’s not the place for me.
About seven years ago, my husband and I formulated a “five-year plan.” We would keep our new Anchorage condo until we had built up enough equity to make money selling it. That would be our ticket out of Alaska. We would move to a place where you didn’t have to use a flashlight to navigate to your car at four o’clock on a winter afternoon, where the highway wasn’t littered with traffic accidents every time fall turns to winter. Every. Single. Time. Lifelong Alaskans forget how to drive in snow, each and every winter. We dreamed of finding a place where people grew crops like melons and tomatoes right outside in their yards, no greenhouses and heaters needed. A place where summer was summer, and fall was a riot of color. A place where there was no snow to shovel. In other words: paradise.
A year and a half ago, we packed up our belongings and son, and, with the help of my best friend who helped me stay sane on the long drive to Juneau, Alaska so that we could take the ferry to the state of Washington, we left the place that had been home for Aaron for thirty-one years (only fourteen for me).
Now we’ve been in our “forever home,” a low brown house on two acres, built in 1979, for one summer, after renting for a year while house hunting. And it is paradise. Here it is, the end of October, and the slight chill of the last few rainy days feels like a rainy day at the height of Alaskan summer. Friends and family in my former homes of Ontario and Alaska are already shoveling driveways and bundling up for the walk from front door to car. Today I was out shopping in a cardigan over a thin summer shirt, and was perfectly comfortable.
But the comfort of a moderate climate is small compared to the sense of amazement I find as I garden here. A couple of weeks ago I saw shoots coming up near our pond, where last spring grape hyacinths had bloomed. I went to the omniscient Google and discovered that these amazing little bulbs sprout in the fall. Plants that come up in October? I had no idea plants did that!
That same weekend, I did some fall planting of bulbs that will provide bright springtime color next year. Planting in the fall! Now, I know people in Anchorage must have done this too, because I have seen with my own eyes crocuses pushing up through snow in late April and early May. But I have never myself done fall gardening. It’s a mind-boggling and delightful concept for someone to whom October means the first snowfall of the year.
Things just grow on their own here, with no help from human hands. In the soil half of my compost bin (that is, the half that is done decomposing and is now rich garden dirt, as opposed to the half that is freshly discarded leaves and kitchen scraps), I just discovered five young tomato plants and a large patch of parsley, joining a melon plant that has an almost-ripe melon that we’ll pick soon. In fact, this isn’t good, not from a gardening perspective. It’s a sign that the compost pile isn’t decomposing properly, killing seeds with internal heat as it ought to. But I can’t bring myself to uproot these miracle plants. Young parsley and tomatoes sprouting in October, as if no one told them they’re supposed to be curling up and dying under a layer of snow, rigid inside a foot of frozen earth. Incredible.
But, oddly, the plant that has solidified this sense of magical fall growth has been garlic. Researching this summer, I discovered that garlic is best planted either in fall, for a late-winter/early spring crop, or in late winter for an early summer crop. So said, again, the all-knowing Google. But I didn’t truly believe it. What northern gardener would put plants into the ground in October and expect to harvest in winter? I planted anyway, obedient to the wisdom of search engines, shaking my head at the crazy idea of a January harvest.
And then. And then. Last weekend I strolled past the garden bed where I’d planted the garlic. And – NO WAY! Seven fresh green sprouts against the dark brown earth. Sprouts in October, promising a winter crop, a frail green proof of paradise.


 Whatever the reason for the magic touching our home, I’m grateful and delighted. Grateful for the beauty, grateful for a respite from pain that allows me to enjoy it, and grateful for our life here in the country after too long hemmed in by a city’s concrete. Delighted by the surprises I encounter nearly every day.


 springtime color next year. Planting in the fall! Now, I know people in Anchorage must
  have done this too, because I have seen with my own eyes crocuses pushing up through snow in late April and early May. But I have never myself done fall gardening. It’s a mind-boggling and delightful concept for someone to whom October means the first snowfall of the year.


