When I was a little girl, my family spent seven years on a remote British Columbia trapline. With no electricity, refrigeration was only available in the winter, so eggs were a rarity — and when we did have them, they had to be used up quickly. Some of my favorite foods are the result of this sporadic need to consume eggs: quiche, egg gravy over biscuits, and my ultimate favorite, Finnish pancake. This last dish is like a beautiful marriage between a sweet soufflé and a custard. It can be served with fresh berries and powdered sugar, with syrup, or on its own.
We moved back to civilization, in the form of a group of communes clustered around a tiny village in Northwest Ontario, when I was eleven. Eggs were always available here, but they were portioned carefully: we did have refrigeration in the community kitchen and could store them, but since we didn’t raise our own chickens, the eggs had to be purchased. Cooking for thirty or forty people at a time uses up a lot of eggs when you’re making egg-rich dishes. So here, too, Finnish pancake was a rare treat. It was made even more rare by the fact that a lot of the people with whom we shared meals didn’t care for it, so when it was my mom’s turn to cook breakfast, she usually chose a more universally pleasing meal.
After I moved away and got married, Finnish pancake wasn’t a food I thought about much. I made it once or twice, using recipes I found online, but they were never the way I remembered my mom’s turning out. Why I didn’t just ask my mother for her recipe, I don’t know. It wasn’t until a couple of years ago, thinking it would be a great Easter breakfast choice, that I suddenly developed anew my passion for Finnish pancake. I tried all the recipes I’d tried previously, considering the possibility that I might have made a mistake when making them earlier. I tried similar dishes, like clafuti, and pannukakku or pannu kakku (which is Finnish for pan cake), and German oven pancake. They were all good, and my family ate them happily, but none of them turned out like my mother’s. All of them rose less dramatically, were much thinner, felt less firm and dense, and just… were not the same. They all had similar ingredients and methods, but one thing I noticed that was different among them was the inclusion of baking powder — some had it, most didn’t. Maybe if I could find the perfect amount of baking powder, I could make my mother’s Finnish pancake.
After months of failed attempts, I texted my mother. “Do you use baking powder in your Finnish pancake?” She didn’t, which destroyed that hypothesis, and I expressed my frustration at being unable to get my Finnish pancake to turn out like hers. She said, “Why don’t I just send you the recipe?” and proceeded to do so, after finding her worn recipe card that she had copied from a friend years before. Problem solved!
Except… it wasn’t. Even my mother’s recipe didn’t turn out like the Finnish pancake of my memory. However, it was much closer, and by comparing it to the other recipes I’d found, I was able to see how it differed from them and then adjust those differences. After more attempts than I bothered to count, all of them delicious but not quite right, I finally produced the delectable dish of my childhood. It took nearly a year, but by the next Easter, I had perfected it and scribbled it down.
Now it’s almost Easter again, and I realized this would be the perfect time to share this delicious breakfast favorite, which my kids devour like starving wolves and which my husband has pronounced “very good.”
This recipe fills a large casserole dish. I sometimes use a deep, 9-inch, round stoneware dish, and other times I use one that’s about 8″x12″. The depth and size of the dish will affect the texture and cooking time somewhat, but not enough to worry about. What is important is that the sides are high enough to allow the batter to rise at least double in the oven. It makes about 8-12 slices, depending on the size of pan you use, which is enough to feed my family of four with just a little left over. By the time Sofia is in school, Im sure I’ll need to double the recipe to satisfy everyone’s appetite.
First, collect your ingredients:
- 6 eggs
- 1 teaspoon of vanilla
- 3 cups of warm milk
- 6 tablespoons of melted butter
- 2 teaspoons of salt
- 1 3/4 cups of flour
- 1/4 cup of sugar
- More sugar, for sprinkling
Heat the oven to 425ºF.
Start by lightly beating the eggs in a large bowl, using a hand mixer.
In a separate dish, mix the warm milk (warming it a bit keeps the butter from congealing), vanilla, and melted butter. Use a third dish to combine the dry ingredients. Add about 1/3 of the milk mixture to the eggs, beating the mixture until it’s combined. Continue to beat the batter while you add 1/3 of the flour mixture.


Repeat this twice more until all the ingredients have been combined. The batter should be pale yellow, slightly frothy, and very runny. Pour the batter into an ungreased casserole dish. It should fill the dish about a third of the way, no more than halfway.
Bake it for 40-60 minutes, depending on the depth of the dish. If desired, open the oven about five or ten minutes before the end, while the top is still a little moist, and very gently sprinkle sugar on top.
When the pancake is done, it will be golden brown, dry on the outside, slightly cracked, and very puffy, with the top rising to the top of the dish or above. It will still look wet under the cracks, and there might be butter in small pools on the surface. It will collapse quickly as it cools, leaving a slightly higher crust around the edge; this is not evidence that you’ve made a mistake, it’s just the way Finnish pancake is. I recommend letting it rest for at least five minutes on the counter.When it first comes out of the oven, the center underneath the crust will be slightly wobbly and wet-looking, like custard. You can eat it like that, right out of the oven, but my kids tend to like it better after it’s had a chance to rest, cool, and set up a bit more.


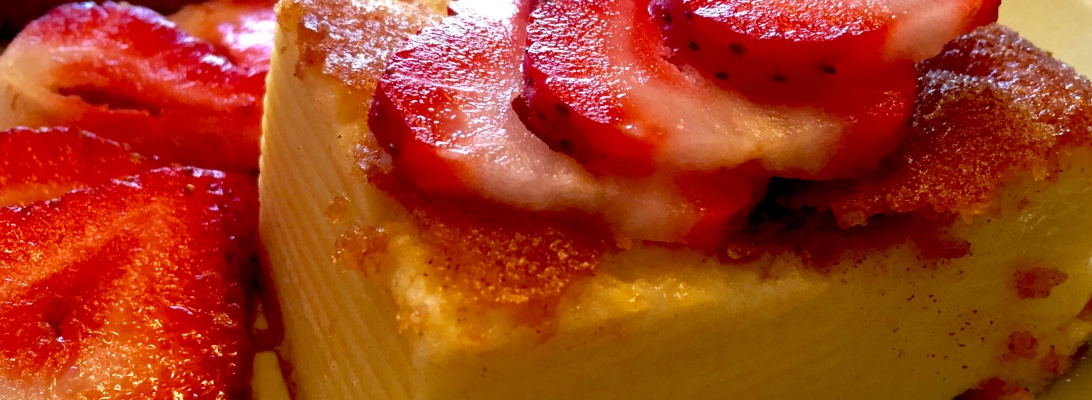
Finnish pancake is extra delicious and very pretty when it’s served with a sprinkle of powdered sugar and fresh fruit on top — sliced strawberries, blackberries, and raspberries are our favorites. You can also eat it either buttered or unbuttered, with maple syrup, with powdered sugar, or plain. It’s delectable no matter what.